The code and related material in this main branch are for our ICML 2021 oral work, titled Conformal Prediction Interval for Dynamic Time-series (Xu et al. 2021a). Please use codes in this repository, as those downloaded from PMLR are not the most updated ones. You may direct any inquiries either to Chen Xu (cxu310@gatech.edu) or Yao Xie (yao.xie@isye.gatech.edu). The work is constantly updated to incorporate new feedback and ideas.
We have significantly revised and extended the ICML 2021 work, which is accepted by 🌟IEEE Transactions on Pattern Analysis and Machine Intelligence🌟. The most recent version is also available on arxiv. The Journal_code branch contains updated codes, which essentially follow the same structure as those in this branch. Nevertheless, feel free to message us if you have any question regarding either branch.
Open-source implementation
We are excited that the work has been integrated as a part of
MAPIE, which is a scikit-learn-compatible module for predictive inference.
🌟Sequential Predictive Conformal Inference for Time Series🌟 (Xu et al. 2023) is our latest work on this topic, where we advance EnbPI by considering time-adaptive re-estimation of residual quantiles, improving the performance of EnbPI and other recent CP methods.
Additional modules: statsmodels for implementing ARIMA, keras for building neural network and recurrent neural networks, and pyod for competing anomaly detection methods.
tests_paper.ipynb provides an illustration of how to generate the main figures (Figure 1-4) in the paper. The code contents are nearly identical to those in tests_paper.py.
tests_paper+supp.py reproduces all figures, including additional ones found in the Appendix. It is written in Jupyter notebook format, so that they are meant to be executed line by line.
EnbPI implementation:
PI_class_EnbPI.py implements the class that contains EnbPI (line), Jackknife+-after-bootstrap (line, paper), Split/Inductive Conformal (line, paper), and Weighted Inductive Conformal (line, paper). We used ARIMA as another competing method.
Because conditional coverage (Figure 3) and anomaly detection (Figure 4) require problem-specific modifications, the code changes are not contained in “PI_class_EnbPI.py” but in their respective sections within tests_paper.py/tests_paper+supp.py.
Other Function Files:
utils_EnbPI.py primarily contain plotting functions for all figures except Figure 4.
PI_class_ECAD.py implements ECAD based on EnbPI (see [Xu et al. 2021a, Section 8.5, Algorithm 2]) and utils_ECAD.py contains helpers for anomaly detection.
Additional Files
The Data repository contains all dataset in our paperexcept the money laundry one for Figure 4 (due to size limit).
The Results repository is provided for your convenience to reproduce plots, since some experiments by neural network/recurrent neural networks can take some time to execute. It contains all .csv results files on all dataset.
Broad Usage: To wrap EnbPI around other regression models and/or use on other data, one should:
If other regression models: Make sure the model has methods .fit(X_train, Y_train) to train a predictor and .predict(X_predict) to make predictions on new data. Most models in sklearn or deep learning models built by keras/pytorch are capable of doing so.
If other data: We have assumed that all our datasets are save as pandas.DataFrame and convertible to numpy.array. However, such assumptions are purely computational. Please feel free to adjust the data formate as long as it can be processed by regression models of choice.
We are fortunate to pre-record a long presentation and give an oral presentation at the Proceedings of the 38th International Conference on Machine Learning (ICML 2021). The long presentation is available on Slideslive and the oral presentation will be given at the conference once the date is finalized.
Encountering “NotImplementedError: Cannot convert a symbolic Tensor (lstm_2/strided_slice:0) to a numpy array” when using RNN as the regression model:
See this github answer to resolve the problem, primarily due to numpy & python version issues.
References
Xu, Chen and Yao Xie (2023). Sequential Predictive Conformal Inference for Time Series. Proceedings of the 40th International Conference on Machine Learning, PMLR 202, 2023
Xu, Chen and Yao Xie (2023). Conformal prediction for time-series. Journal version, IEEE Transactions on Pattern Analysis and Machine Intelligence.
Xu, Chen and Yao Xie (2021). Conformal prediction interval for dynamic time-series. Conference version, The Proceedings of the 38th International Conference on Machine Learning, PMLR 139, 2021.
Xu, Chen and Yao Xie (2022). Conformal prediction set for time-series. ICML 2022 Distribution-Free Uncertainty Quantification workshop.
Xu, Chen and Yao Xie (2021). Conformal Anomaly Detection on Spatio-Temporal Observations with Missing Data. ICML 2021 Distribution-Free Uncertainty Quantification workshop.
The block diagram below depicts the board architecture:
Board glue logic
Most board glue logic is implemented with an Altera EPM7128S CPLD. This part is obsolete but modern replacement exists with ActelMicrosemi Microchip ATF1508AS (never tested though). The CPLD implements:
DRAM address multiplexing
DRAM refresh
basic memory management: base address translation and inbound check with power of two alignment constraints
8-bits expansion bus access, for 8-bits wide or 16-bits wide memory cycle from the 68000
first stage boot procedure, by copying during reset the 512 first bytes from the flash memory (see MFP chip description below) at address 000000h in DRAM.
Expansion bus also uses a few discrete logic (74245 buffers and 74138 address decoder).
An additional 74148 encodes interrupt sources to CPU IPL0/1/2.
memory management
The CPLD provides very basic memory management capabilities, for user mode accesses only (FC2 set to 0). It relies on two value set with four registers. These registers are write only, 16-bits, but only the upper bit 15:8 are used.
register
address
description
MMU_BASE_LO
FE0000h
base address bits 19:12
MMU_BASE_HI
FE0002h
base address bits 22:20
MMU_MASK_LO
FE0004h
address mask bits 19:12
MMU_MASK_HI
FE0006h
address mask bits 21:20
Any user address is and’ed with MMU_MASK then or’ed with MMU_BASE. It results in a memory area allocated to a user program with a power of two size, with a base address aligned to its own size. Any user access that targets an address above the allocated size ends with a bus error.
interrupt management
The autovectored interrupt scheme is used (VPA# assertion). To save pins on the CPLD the FC0 and FC1 are not available to identify an interrupt acknowledge cycle, so any read cycle at FFFFFFh with FC2 set to 1 is considered as such.
8-bits expansion bus
This bus provides access to 5 peripherals:
4 available through dedicated connectors (2×10 female pin headers)
1 embeded to the board: the MFP
It provides for each peripheral up to 128kiB aperture into CPU memory space.
The table below lists the signals on this bus as seen for each slot.
signal
type
shared
description
RST#
input
yes
system reset
CE#
input
no
access enable
ACK#
open drain output
yes
access acknowledge
WE#
input
yes
write enable
ALE#
input
yes
address latch enable
IRQ#
open drain output
option
interrupt request
A0
input
yes
address bit 0
AD[7:0]
bidir
yes
address / data
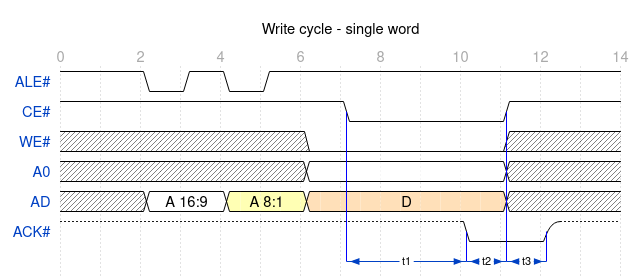
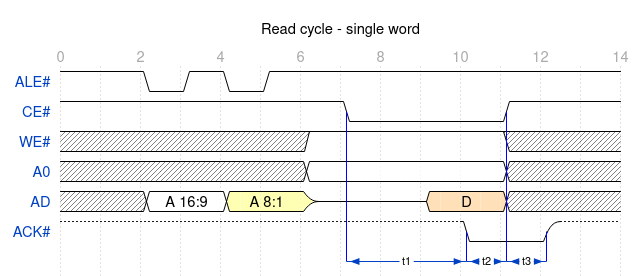
single access cycles
This is how translates a byte access from the 68000 (UDS# or LDS# alone)
note: peripherals like the MFP ignore the address bits 16:1 and can ignore the ALE# signal.
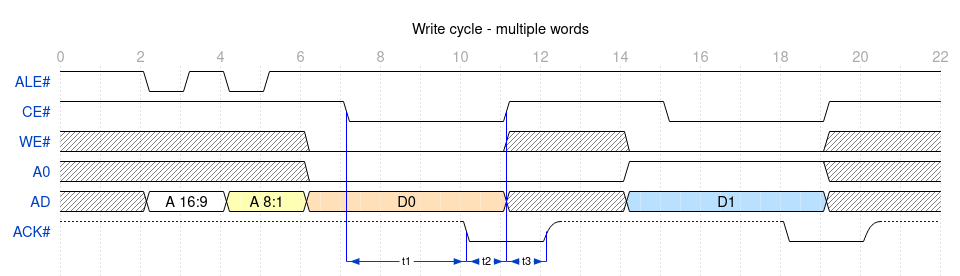
multiple access cycles
This is how translates a 16-bits access from the 68000 (UDS# and LDS#)
Bootstrap loading
Right after a reset, the CPLD starts by transfering 512 bytes of data from the MFP FLASH_DATA register into the first bytes of DRAM. Then the very first 68000 memory access (at 0000000h) is performed.
Because any software is to be much bigger than just 512-bytes, this chunk of code must itself include assembly instructions to copy the rest of the code – still accessing FLASH_DATA register.
The MFP contains two software images for the 68000:
a serial bootstrap, loading from the serial interface the binary to jump in, that is enables by pressing ‘s’ key on a keyboard plugged into the PS/2 port
or an embedded binary to jump in.
To change the embedded binary, the MFP firmware must be recompiled and programmed (the 68000 binary is a constant data table within the microcontroller firmware).
MFP (multifunction peripheral)
This is a software defined chip base on a PIC18F27K42 microcontroller. It provides:
embedded flash with 2 software images for the 68000, selection by detecting pressed key at reset.
IOs/timer with dedicated low-priority interrupt: two PS/2 port, one serial link, 1 kHz RTC timer
250 Hz system timer with dedicated highest-priority interrupt
hard/soft reset
debug register (POST or so)
The MFP has only two memory locations accessible through the expansion bus: one to set the actual register to access, the other to read or write data from/to the register.
register
address
description
MFP_DATA
F00000h
MFP register data
MFP_ADDRESS
F00001h
MFP register index
Register set
register
index
description
FLASH_DATA
0
boot flash data access. flash data pointer auto increments
TICKS
3
4-us ticks counter, 0-249
UART_STS
4
UART status bit 7: TX ready bit 1: RX FIFO overflow bit 0: RX FIFO underflow
UART_DATA
5
UART data in/out
POST
7
POST code (debug)
PS2P0_STS
8
PS/2 port 0 status bit 0: data available
PS2P0_DATA
9
PS/2 port 0 data
PS2P1_STS
10
PS/2 port 1 status bit 0: data available
PS2P1_DATA
11
PS/2 port 1 data
SYSCFG
12
system tick configuration bit 0: enable timer interrupt bit 5: set by bootstap loader to prevent flash to RAM boot transfer bit 6: enable self immediate interrupt bit 7: soft reset
SYSSTS
13
system tick status bit 0: timer interrupt pending bit 6: self immediate interrupt pending
IRQCFG
14
interrupt controller configuration bit 0: enable RTC interrupt bit 1: enable PS/2 keyboard interrupt bit 2: enable PS/2 mouse interrupt bit 3: enable UART RX interrupt
IRQSTS
15
interrupt controller status bit 0: RTC interrupt pending bit 1: PS/2 keyboard interrupt pending bit 2: PS/2 mouse interrupt pending bit 3: UART RX interrupt pending
Memory mapping
memory range
access
size
memory area
000000h – 7FFFFFh
U/S
8MiB
DRAM. memory address translation/mask/check for user mode only
800000h – EFFFFFh
S
7MiB
DO NOT USE. mirrors F00000h – FFFFFFh
F00000h – F1FFFFh
S
128kiB
MFP registers. address bits 16:1 are ignored
F20000h – F3FFFFh
S
128kiB
expansion bus connector J9
F40000h – F5FFFFh
S
128kiB
expansion bus connector J11
F60000h – F7FFFFh
S
128kiB
DO NOT USE. reserved for expansion bus hardware implementation
F80000h – F9FFFFh
U*/S
128kiB
expansion bus connector J10. *: user access to be removed
FA0000h – FBFFFFh
S
128kiB
DO NOT USE. unmapped, might be used for another peripheral slot
FC0000h – FDFFFFh
S
128kiB
expansion bus connector J8
FE0000h – FFFFFFh
S
128kiB
restricted to PMMU register configuration
BOM
This table below is no spec, it just shows the parts that equip the board on my desk.
We provide training/rendering code for the 6 OcMotion sequences that are sampled by Wild2Avatar. If you find the preprocessed sequences useful, please consider to cite Wild2Avatar and CHOMP.
Please download the processed sequences here and unzip the downloaded sequences in the ./data/ directory. The structure of ./data/ should look like:
Please register and download the neutral SMPL modelhere. Put the downloaded models in the folder ./assets/.
3. Canonical OpenPose canvas
To enable more efficient canonical space SDS, OpenPose canvas for canonical 2D poses are precomputed and can be downloaded here. Put the downloaded folder in the folder: ./assets/.
(optional) 4. SAM-HQ weights
For training the model in Stage 0 (optional, see below), we need to compute binary masks for complete human inpaintings. We utilized SAM-HQ for segmentation. If you wish to compute the masks on your own, please download the pretrained weights sam_hq_vit_h.pthhere and put the donwloaded weights in the folder: ./assets/.
After successful downloading, the structure of ./assets/ should look like
We provide our pretrained models for all the OcMotion sequences to allow for quick inference/evaluation. Please download the ocmotion/ folder here and put the downloaded folders in ./output/.
Usage
The training of OccFusion consists of 4 sequential stages. Stage 0 and 2 are optional and inpaint the occluded human with customized models, sovlers, and prompts. Different combinations may impact the inpainting results greatly. A high-quality pose conditioned human genertaion is out of the scope of this work. We provide our code (see Stage 0 and Stage 2 below) to allow users to try themselves.
We provide our precomputed generations (to replicate our results in the paper) to be downloaded here. Please unzip and put the oc_generations/ folder directly on the root directory. If you use our computations, Stage 0 and 2 can be skipped.
(optional) Setting Cache Directory for Hugging Face Models
Before training, we highly recommend specifying a customised directory for caching Hugging Face models, which will be downloaded automatically at the first run of the training scripts.
Run Stage 0 (the Initialization Stage) to segment and inpaint binary masks for complete humans with SAM and Stable Diffusion. To run Stage 0 on a OcMotion sequence, uncomment the corresponding SUBJECT variable and
source run_oc_stage0.sh
The segmented binary masks will be saved in the ./oc_genertaions/$SUBJECT/gen_masks/ directory.
Stage 1
Run Stage 1 to start the Optimization Stage. To run Stage 1 on a OcMotion sequence, uncomment the corresponding SUBJECT variable and
source run_oc_stage1.sh
The checkpoint along with renderings will be saved in ./output/$SUBJECT/.
(optional) Stage 2
With an optimized model, run Stage 2 to launch incontext-inpainting. To run Stage 2 on a OcMotion sequence, uncomment the corresponding SUBJECT variable and
source run_oc_stage2.sh
The inpainted RGB images will be saved in the ./oc_genertaions/$SUBJECT/incontext_inpainted/ directory.
Stage 3
Lastly, with the inpainted RGB images and the optimized model checkpoint, run Stage 3 to start the Refinement Stage. To run Stage 3 on a OcMotion sequence, uncomment the corresponding SUBJECT variable and
source run_oc_stage1.sh
The checkpoint along with renderings will be save in ./output/$SUBJECT/.
Rendering
At Stage 1 and 3, a rendering process will be trigered automatically after the training finishes. To explicitly render on a trained checkpoint, run
source render.sh
Acknowledgement
This code base is built upon GauHuman. SDS guidances are borrowed from DreamGaussian.
Check also our prior works on occluded human rendering! OccNeRF and Wild2Avatar.
Citation
If you find this repo useful in your work or research, please cite:
@inproceedings{occfusion,
  title={OccFusion: Rendering Occluded Humans with Generative Diffusion Priors},
  author={Sun, Adam and Xiang, Tiange and Delp, Scott and Fei-Fei, Li and Adeli, Ehsan},
  booktitle={The Thirty-eighth Annual Conference on Neural Information Processing Systems},
  url={https://arxiv.org/abs/2407.00316},
  year={2024}
}


