Lastly, the generated file will be located inside build/generated/ksp/, but your IDE might not
able to identify it. In such case you can add it manually like below:
In real world you might want to pass value from Adapter to ViewHolder. If you want to achieve
this just label the parameter with the same Annotation from both side than we will help you to
link them together. For Adapter, please add parameter in constructor. For ViewHolder, you can
choose either constructor or the bind function which has @BindFunction.
Note: There’s not type restriction for the parameter and we also don’t force them to be equal, but
it will compile fail if it can’t match.
Contributing
It’s an interesting project to me and it’s also in very early stage for now. Any thing can be
changed and any kind of contribution or participate is welcome. Feel free to ask questions or report
bugs. And we’re also welcome you to create new pr if you have any idea!!
License
The module is available as open source under the terms of
the MIT License.
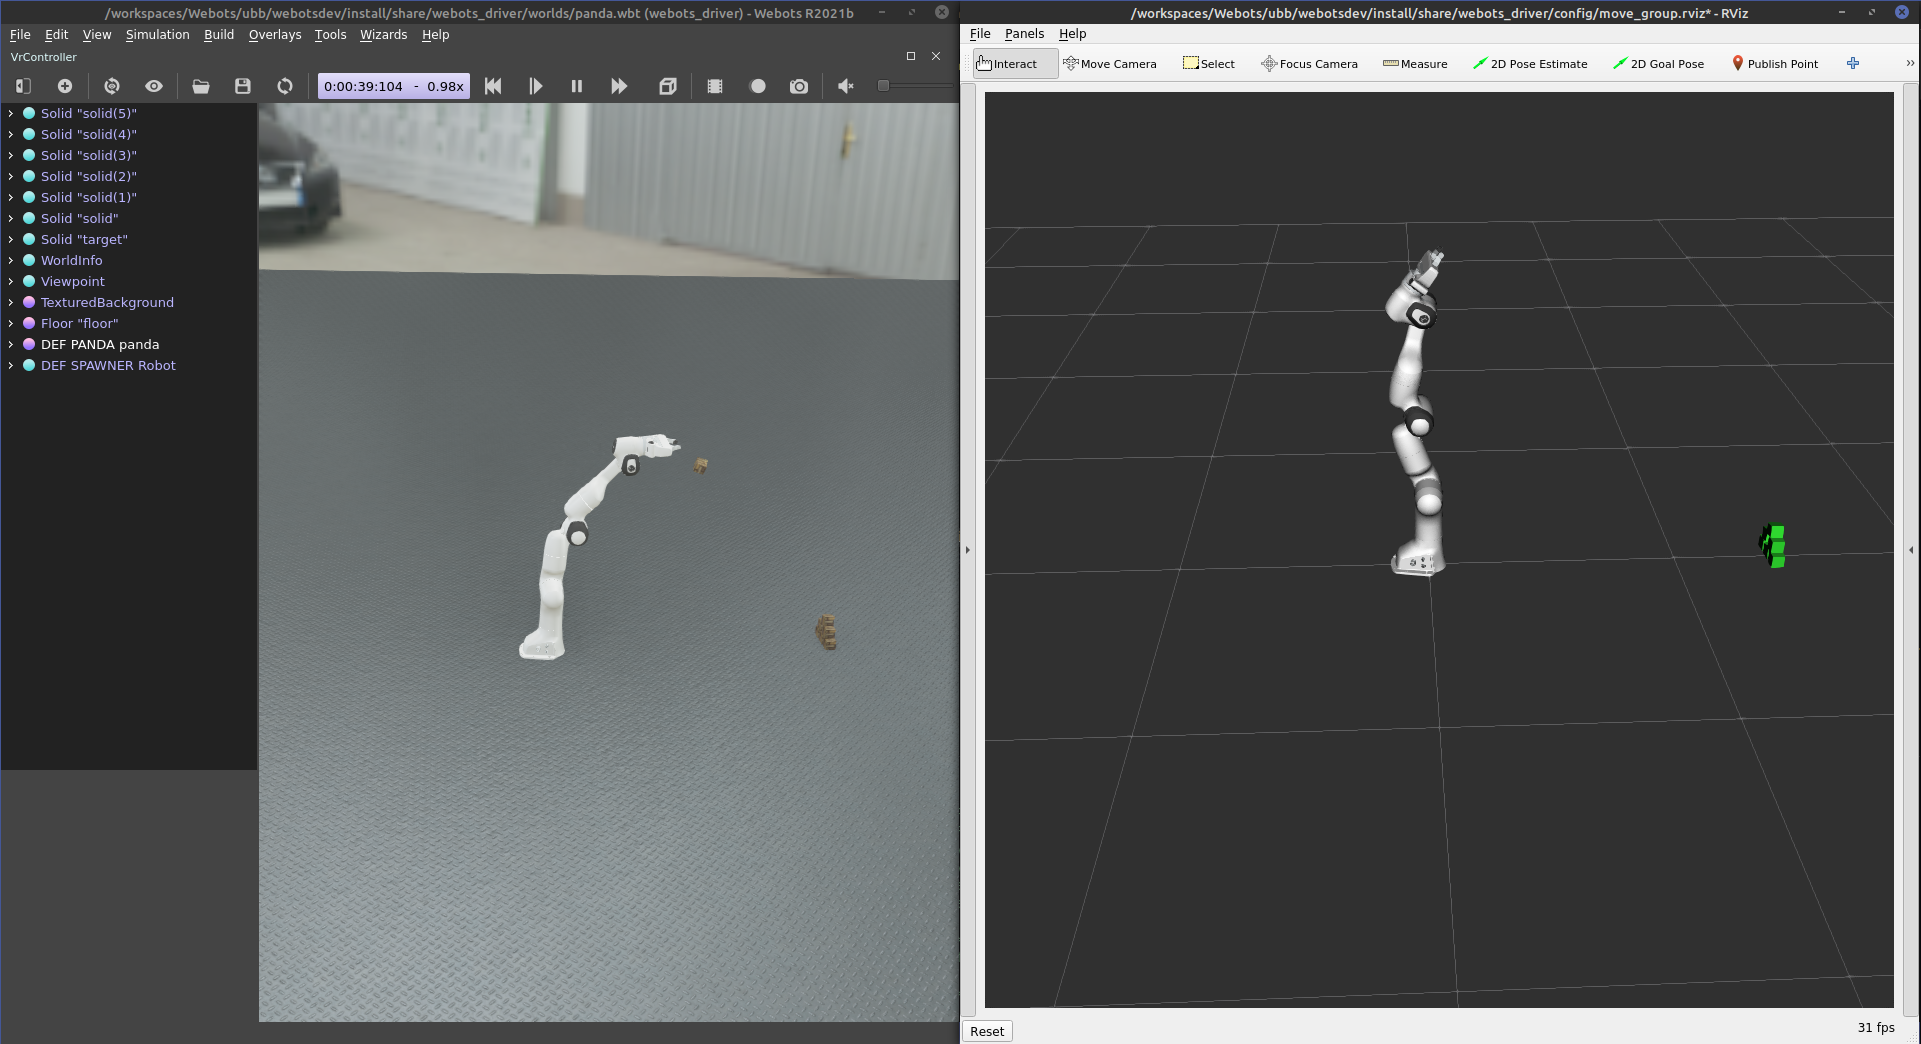
This task involves one Franka Panda robotic arm randomly taking 5cm cubes from a table with 21 cubes arranged in a 7 * 3 grid and stacking them. It will stack them into 3 stacks of 5 cubes. The number of columns and the the heigt can be configured in moveit_controller.launch.py
Throw Task
For this, a Franka Panda arm will pick up a cube and throw it toward a pyramid made of 6 cubes. The arm will go as far back as it can and perform a throwing motion toward the ground in front of it. The ball will be released at 50% of the trajectory as it is the moment with the most amount of forces. The pyramid is placed such that a successful throw at full power will collapse it.
Instructions
Requirements
OS: Ubuntu 20.04 (Focal)
Other distributions might work (not tested).
Dependencies
These are the primary dependencies required to use this project.
Install/build a version based on the selected combination of ROS 2 release and Ignition version
Building
Clone this repository and import submodules. Then install dependencies and build with colcon.
# Install pyquaternion
pip install pyquaternion
# Clone this repository and the submodules into your favourite ROS 2 workspace
git clone https://github.com/09ubberboy90/simple_webots_ros2.git
# Install external dependencies via rosdep
rosdep install -r --from-paths src --ignore-src --rosdistro ${ROS_DISTRO}# Build with colcon
colcon build --merge-install --symlink-install --cmake-args "-DCMAKE_BUILD_TYPE=Release"
Sourcing
Before utilising this package, remember to source the ROS 2 workspace overlay.
source${ROS2_WS}/install/local_setup.bash
Running
The following tasks can be either run as an independant launch or can be recorded
Stacking cube
ros2 launch webots_driver stack_cubes.launch.py
Throwing cube
ros2 launch webots_driver throw_cubes.launch.py
Recorder
The recorder can be launched with.
ros2 run sim_recorder run_recording
It has some argument option to configure what the task will be
--help: Gives a list of arguments
-t, --throw: Start the Throwing Task
-i, --iteration: Number of run that should be performed
-s, --start: Start index in case some run need to be rerun after an interuption
--headless: runs without a GUI
The recorder will save the CPU and RAM usage in sim_recoder/data/{sim_name}.
sim_name is created automatically based ont the simulation name ignition and on the arguments:
_gui is added if --headless is not passed
_throw is added if --throw is passed
An analysis of the run can be performed by running from the source of the repo
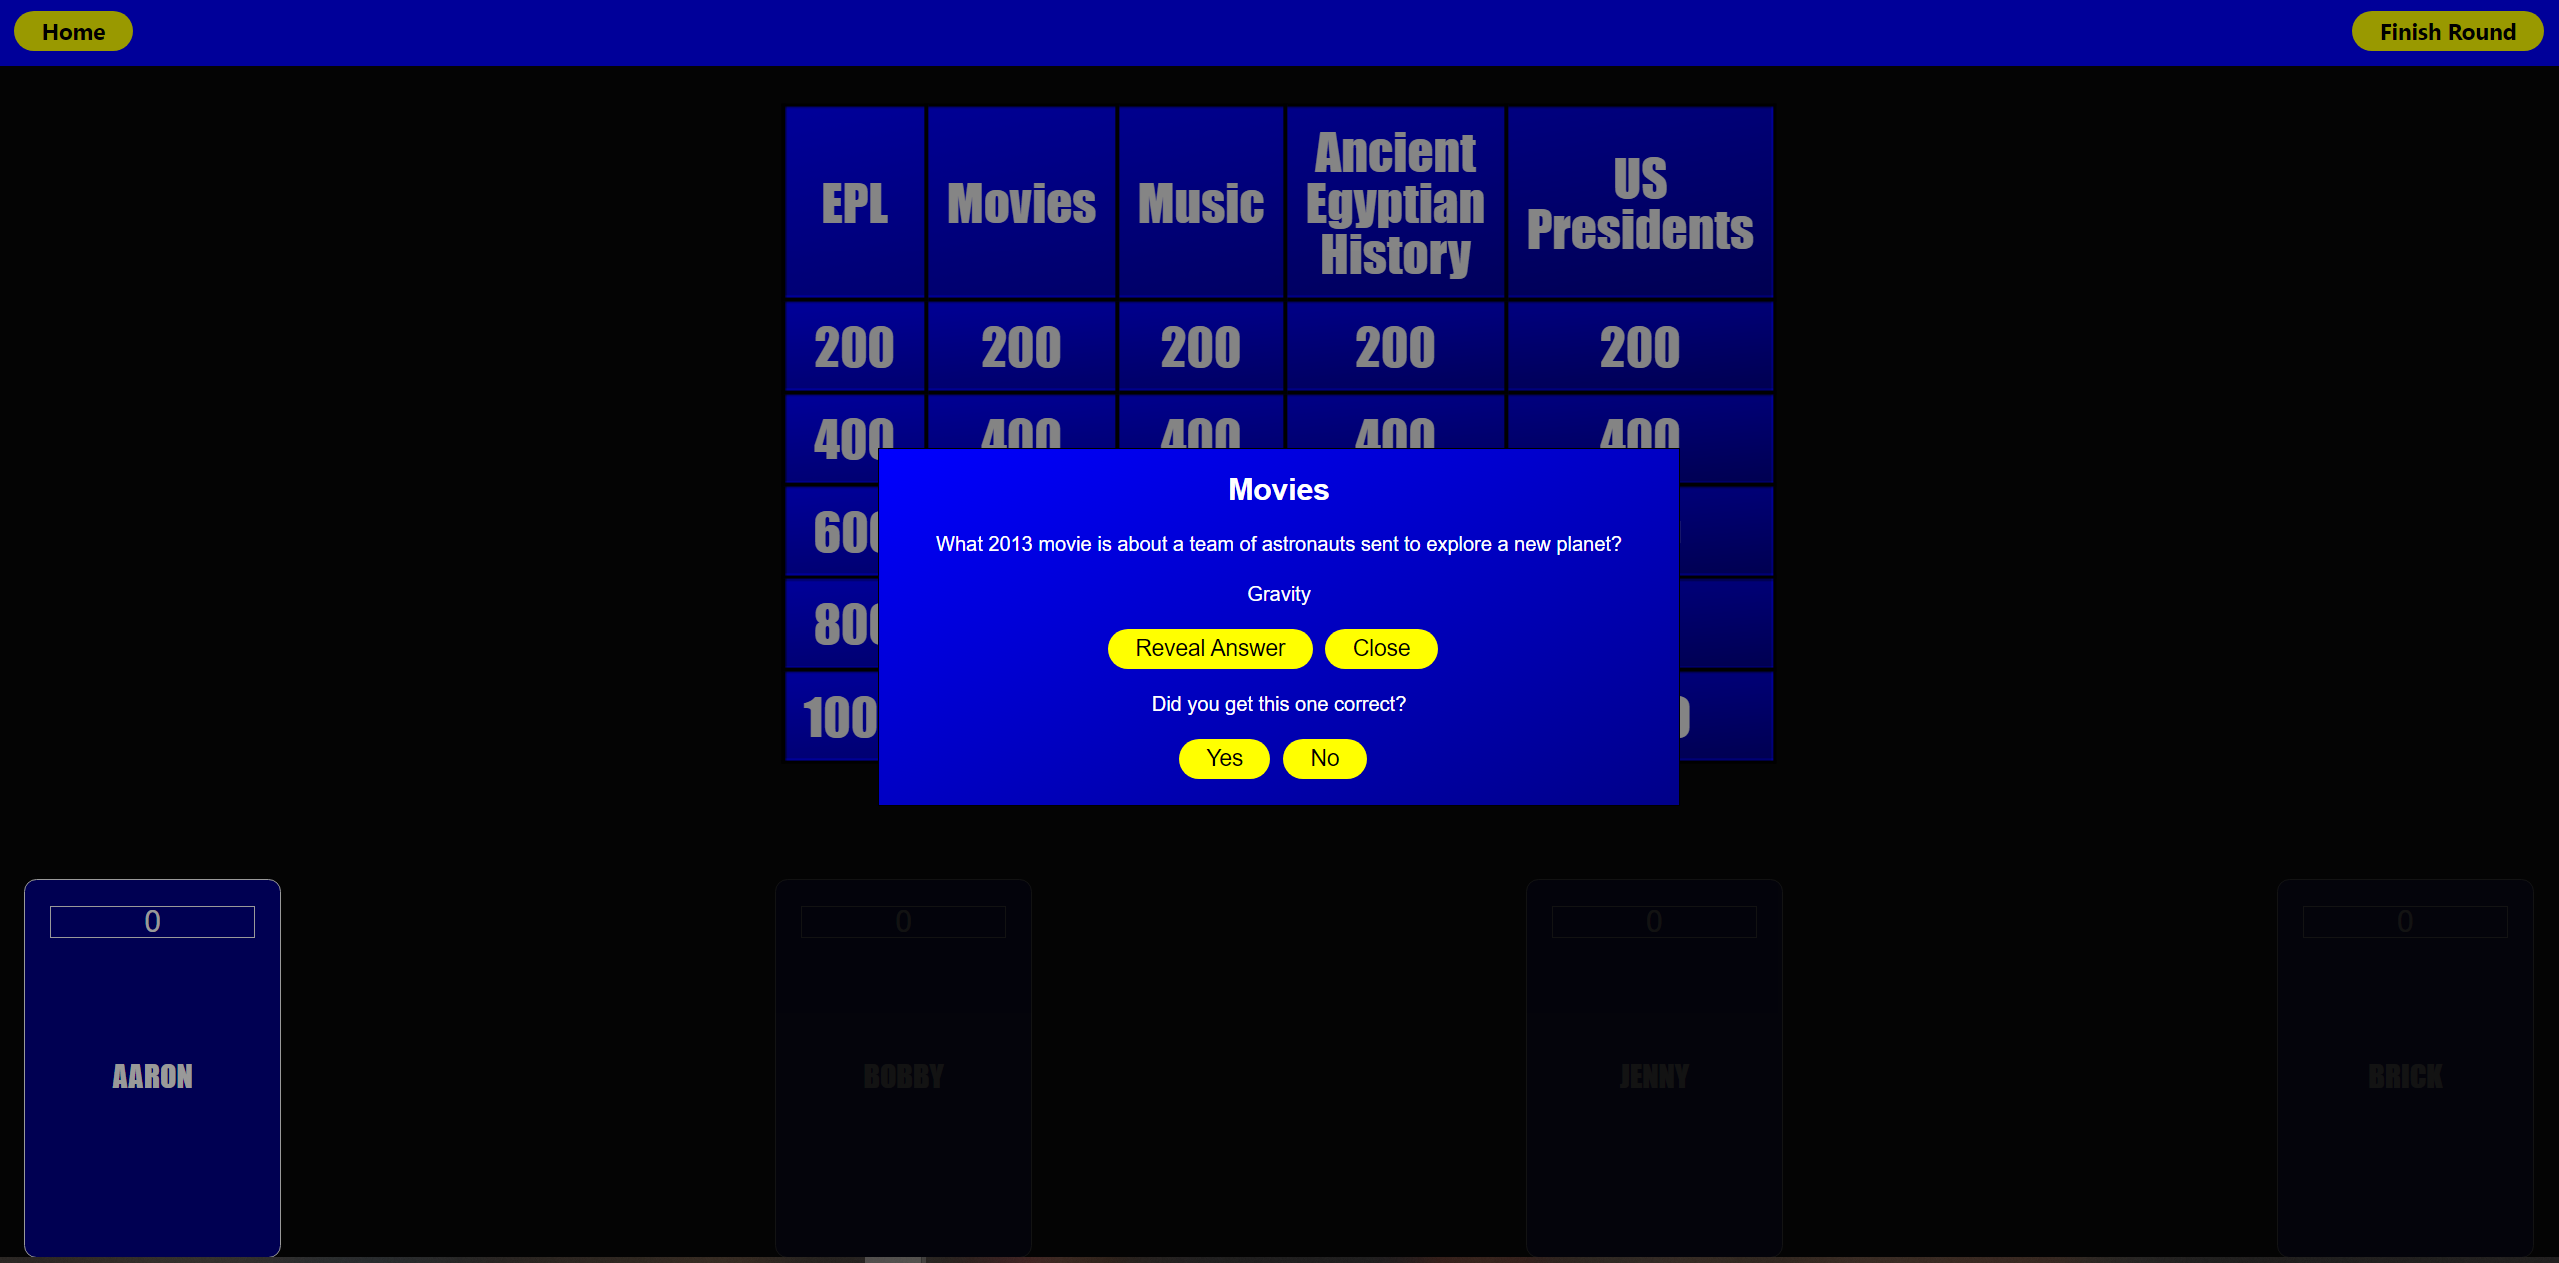
QuizShowGPT is a game that fuses AI large language learning model with Jeopardy style quiz shows!
How it works
This app uses OpenAI’s ChatGPT to generate questions for a game of Jeopardy.
User can enter custom categories for ChatGPT to use when creating questions. If the user enters less than 5 or no categories, the game will generate categories for you.
There are 2 rounds, with a leaderboard in netween rounds.
The score and questions data is stored in the browser’s window session so any accidental refresh will not result in a new call to OpenAI.
Make sure to click the current player’s scoreboard so the score is added to the correct player.
Coming soon
“Re-gen” button that allows user to regenerate the board if the questions are bad
Database functionality so save good questions boards
user feedback for good/bad game boards to improve results from ChatGPT
Dev notes
Be aware that some of the information generated by ChatGPT may be incorrect (I know, not really ideal for a trivia game right?) ChatGPT is constantly evolving and getting better at responding to prompts, so keep that in mind!
ChatGPT has a limited understanding of the world over the last few years.
More vague categories may result in easier questions
Hyper-specific categories may result in repeated or easier questions
Be aware that the idea of Jeopardy is to have increasingly difficult questions as the point value gets higher, but ChatGPT is hit-or-miss when it comes to scaling difficulty of the questions. ie the 1000 point question may be easier than the 200 point question.
Other notes / improvements
Consolidate styling
Improve file structure
Database functionality (models are present, but not hooked yet)
Litmus is a purpose built expressjs and polkadot based RESTful API to demonstrate Node.js and Web3.0 skills.
It offers two APIs:
POST /api/v1/signin
It offers authentication by using substrate account and signature verification, and returns a API signed bearer token as identity for substrate account. Please see the demo section.
GET /api/v1/secret
Its token authenticated API that returns random magic strings from Postgres.
The app uses some of the famous npm packages, i.e. express, joi, dotenv, prisma ORM, passport, pino logger with ECS formatting, and more importantly polkadot to verify signatures.
How it works:
Call /challengecode API with your address aka username, and it will give you an arbitrary challenge code that expires after 3 minutes.
Call /signin API with your username, a message containing your username and the challenge code, signature of the message, and the challenge code
If everything works, it will give an signed token that you can use to call other endpoints of Litmus API, for example /secret.
Web3 Version:
Switch to dev branch for Web3 version, that uses Polkadot account for auth.
MakerDAO’s value proposition is stability. There’s a few key things that effect stability, I believe the primary contributors are:
Information – How much does your audience understand about the system they’re participating in? A long-term BTC holder is going to have stronger hands during a 30% drop in price, whereas a newer BTC holder may not be as informed, and thus “weak” hands in situations that may be short-term troublesome.
The blackswan risk for MakerDAO’s system is not the same if Alice Smith was the only CDP holder compared to Joe Lubin being the only CDP holder.
Predictability – Any scenario where there’s volatility, be it in cryptocurrency markets, or sports, or games carrying mixture of skill & chance. The more information that your opponent has in advance, the more they can attempt to predict a certain number of potential strategies that they may be faced with. Like knowing the lineup that will be played for the superbowl team, a coach will use that to mitigate any potential variance.
Something else that I’ve forgotten because I had it on a shitty gist.
🤖Data driven decisions for the following:
Debt Ceiling (SCD & MCD).
CDP ownership/accessibility.
Stability Fee.
Dai Savings Rate.
Oracles & Pricing.
Collater Pool.
🗳Governance driven decisions for the following:
Exchange venues eligible for price discovery.
Oracles integrity and transparency.
Market maker incentives.
Strategy to introduce new asset classes (native on-chain BTC vs tokenized property/securities)
Newer assets to be introduced to the the system.
The further evolved a system becomes, the harder it is to make changes. Early decisions have ongoing effects. Imagine what the ecosystem would look like today if we saw Satoshi create irreversible digital currency and go push it weeks later on gambling and adult forums as a payment method. The shortsighted approach would’nt have given us the foundations we’ve got today. Similarly to MakerDAO being selective in MKR issuance, instead of spraying and praying. Tight foundations are absolutely necessary for a system over the long term.
Below are a series of calculations that I believe construct a more liquid, more scalable & predictable system. Removing the key variables that challenge the core value prop. Stability.
Theoretically hitting the reset button on the system. 0 CDP’s open, 0 collateral, 0 collateral pool.
💸 CDP’s
0 CDP’s available in the system. To generate a CDP, a verifiable on-chain trade must be completed between the collateral and the stable asset. DAI/ETH trade.
1 CDP is able to be generated for every on-chain trade that is verifiable (e.g. a DAI/ETH trade on Uniswap).
The person who completed the trade receives an ongoing decaying portion of the stability fee’s paid on that specific CDP, or is paid a portion of the Dai savings rate paid out. Similar to a mortgage broker driving leads to a bank branch.
Maker does a trade, system generates a new CDP that’s eligible for use (of which the maker is the owner, but not necessarily the CDP holder) Bank (MakerDAO system) –> Mortgage Broker (the maker, capturing benefits from bringing the collateral to the CDP –> Home buyer (end user looking for leverage on-chain).
Q: Why would we not have infinite CDP creation?
A: Remember the scene in the big-short where they found the mortgage brokers who are farming out debt to anyone who will take it. While it’s not an over-collateralized system like MakerDAO, it’s similar in that the introduction of weaker hands or less-educated market participants can bring down the house. CDP accessibility is critical, but it is not critical today, it’s critical long-term. When random bob citizen hears about this crypto thing going up and he buys in, he is more risk to the system than an OG long-term perma bull. To the hodlers reading this, you don’t see blackswan events as bad, you see them as a chance to BTMFD (Buy the dip). Your hands are strong, and provide a stronger base to the system wide risk tolerance. More trades on-chain that are 100% verifiable means a healthier more aggressive trust-minimized price discovery mechanic. The stronger the rate is, the harder it is to enduce slippage relative to the liquidity of the system. So throttling CDP accessibility provides an incentive for on-chain broader distribution of price discovery instead of from a handful of trade teams. Healthier and stronger.
Q: Why pay ongoing reward for these price-discovery/passive traders?
A: Two main reasons
a) System-wide this carries much broader diversification of participation over TWAP over n blocks. Stronger price integrity.
b) Passive contribution and income to participants in other. While mitigating risk through diversified price-discovery , it’s passive adoption of DAI if they’re being rewarded having not felt like they’ve done anything. In fact, they’ve done something very meaningful, contribute to price discovery. Provides a stronger adoption for businesses/merchants/etc also… Startups like Uniswap for example could be receiving all this as an additional revenue for liquidity providers. As easy as buy some token on an exchange portal or something so passive. Plus all others built on top of those exchanges.
📈 Debt ceiling
The debt ceiling is for mitigating risk. Risk exists through poor price discovery relative to how large the system is. So we’re going to compare the miner fees paid on eligible on-chain trades. The proportion of the total block-reward divided by the number of collateral types will help give guidance to the risk levels.
Debt ceiling is calculated as follows:
([Price discovery fees paid per block / Total block reward] x Number of CDP's in the system) / Number of collateral types)
Example
([0.00042 / 2.16] x 9607) / 1) = 1.868%

Debt Ceiling = 1.87% of ETH Total Supply.

Debt Ceiling = 1,972,231.91 ETH
Note: Current Debt Ceiling is at 2.2M ETH
Q: How do we increase the debt ceiling then?
A: To increase the debt ceiling, complete more on-chain trades relevant to the total block reward.
Q: Oracles just disappear? Surely not?
A: No, they still are pushing their rates on chain, and they’ll be utilized in the next section.
🔮 Oracles Role
Oracles are fundamental parts of the system. Right now, predictability gets effected here. There’s a stronger way to do it IMO.
The issue that occurs with a select few oracles presently is that:
Largely a “security through obscurity”. Do not reveal who they are, which I understand the motivations. Hard to scale to a multi-trillion Dai float without ironing this out. A fantastic start so far, but thinking further ahead it seems like the biggest vulnerability.
Exchange selection is not verified or transparent. We all know that CMC is garbage, and only certain exchanges carry enough integrity to truly give an accurate price indication. To mitigate this, most trade venues evaluate this counter-party risk by hitting their books and discovering how much slippage there was. The less slippage, the more honest the numbers that are being claimed.
Multi-variant environments. Exchange fee’s on one platform, differ to another, and withdraw limits, regulations, etc… All wrap up into oracle pricing. Which is not entirely inaccurate, it’s just misleading to a larger dataset that is relying on it. For comparison, it’d be like in 2017, the Kimchi premium 33% arbitrage between South Korea ETH price, and the USA ETH price. _Additional context at the bottom for you.
Q: So what do oracles do then?
A: They’re piping in the price, from eligible exchanges which have been voted in by MKR holders. E.g. Coinbase, Kraken, Gemini, Bitfinex, Binance, whoever. Messari “Real 10” perhaps? Or whatever. The agreeance should be whether it is top of the orderbook, 100 order, 1000 USD order? Etc…
🏆 Stability fee
Relatively straight forward. We’re going to find the gap between the two price feeds. On-chain price discovery of DAI/ETH and compare against USD/ETH price feeds from oracles.
D*Cp
D = Delta between on-chain price (as above) vs oracle pricing. Always Dai/collateralType va USD/collateralType.
Cp = Collateral pool. Could adjust this to a hard collateral ratio which would most naturally be 225%. 225% global pool is 1.5x of the local collateral requirements.
Current example
*Note: Negative number implies a fee to be paid (E.g. stability fee). Positive number would imply a reward (Dai savings rate, or similar incentives to compress the ratio to be ~1:1)
DAI/ETH = 169.854
USD/ETH = 162.935
Delta = -4.07%
Collateral pool = 387.00%
Result
Upper (1.5x collateral pool target) = -15.76%
Lower (2.25x collateral pool target= -9.1654%
Stability Fee = Range -15.76% <> -9.165%
Q: What’s the collateral pool got to do with it?
A: The system is not supposed to be excessively collateralized, it’s supposed to be over-collateralized to a certain point. Beyond that, it becomes dorment and passive participation in the CDP system, which is not efficient and overtime will become largely problematic. I’d suggest dividing collateral pool requirements for CDP’s locally & then MKR systemically.
The change in PETH (# of the underlying asset) has been within 2% over the month (March 13th – April 13th) where we’ve seen the price of the underlying shift 20%, resulting in the collateral pool ratio growing 305% – 385%.
CDP’s are 1.5x, 1.5x system wide over collateralized gives the passive CDP participants motivation to get out of their unused CDP, and avoid fees etc… With finite amount of CDP’s, people should be putting the CDP to work and then leaving the system.
🏘📊Collateral Asset Category
The whole MakerDAO system is reliant on overcollateralizing to insulate risk. This works if the asset lives on-chain (Digitally native) because we have guarantees for being made whole. Recourse is a dimension of risk. The less certain or predictable it is, the more risk is introduced.
With multi-collateral Dai I believe that before we choose assets we need to specify categories. Solving problems now, means they can be productized if they scale. Done correctly, it will result in multiple price feeds on-chain, which are the most battle tested and create an opportunity for productizing those feeds.
First pass at some categories that I see (in order of priority):
Digitally native (ETH, REP, REN, ETC, BTC).
// Cryptographic recourse, 100% verifiable. Smart contract shows me getting paid if x scenario happens.
Digital representation of non digital currencies (e.g. Fiatcoins, Digix, etc…).
// Part cryptographic recourse – Part legal system. Sure the smart contracts are in place, but also I have regulatory bodies I can speak to if I’m not honored my 1:1 redeeming the Fiatcoin from the vendor.
Digital representations of assets (Security tokens, property ownership put on chain, etc…
// Under-developed legal system that’ll take time to get caught up. Resulting in more risk due to more ambiguity in the legal recourse procedures.
💹 Collateral Asset Selection
Some earlier thoughts on the premise of predictability of incoming collateral, trends, ceilings and volume. Provides the system the ability to forecast and plan accordingly. Can be found here if interested
Extra 3: That’s because of additional factors like capital restrictions which means if you get the money into the country, you’re unable to send it back out. Great if you’re offering a remittance service to South Korea, not optimal if you’re trying to find the trade, execute, realize profit, reinvest, rinse/repeat. The capital outflows is your choke point so you aren’t able to realize the arbitrage. Thus the premium stays for far longer than most would expect it to. Comparatively in the real world, USD to China is done as USD to CNH very frequently. Because the on-shore restrictions that exist in China (like South Korean example). So what they do, they typically don’t compare CNH/CNY because it’s largely not apples to apples. They compare USD/CNY to USD/CNH and try use that.
The game we implemented on CPUlator is Tic-Tac-Toe. It uses the PS/2 Keyboard to get input from the user.
Compile and load the code provided on CPUlator.
Upon loading the code you will see a welcome screen. Press [X] to start the game.
You will now see the game board. This is a 2-player game. At the bottom of the screen is who’s turn it is. Use the number keys to decide which box to place your piece in. For example, if you would like to place X in box 5, press the 5 number key. You can also use [A], [W], [S], and [D] to select boxes (See Note).
Once you have selected your box, press [Enter] to draw. You should now see either an X or O drawn in the box depending on whose play it is.
Keep playing until one person gets 3 consecutive boxes. The game will indicate a winner by drawing a red line over the winning boxes and the status at the bottom will also show there is a winner.
To start a new game, press [Spacebar].
While you are playing the game, you can press [H] to open the help screen. This gives a list of all the keyboard controls the game uses. Press [Escape] to close the help screen and resume your game.
Additional feature:
The user can press [C] to make the AI create a move. This will allow players to play against the computer or help players beat their friends with the assistance of the AI.
Note: The keys for A, W, S, D, and C invoke 2 keyboard interrupts when typed and we think that is something to do with CPUlator itself. When you type either of those keys, the selection box will move quite fast making it difficult to select. We recommend instead of typing these keys, you send a Make signal instead (see the image below). Typing any of the other keys (other than A, W, S, D, and C) in the game work fine.
Angela is a PHP worker/microservice framework based on ZeroMQ.
A typical Angela application consists of a job-server, a client to communicate with the server and workers which do the actual jobs. Angela provides the job server, the client and an API so you can easily implement your worker processes.
             +--------+
             | Client |
             +--------+
                 ^
                 |
                 v
           +------------+
           | Job Server |
           +------------+
     +-------^   ^    ^------+
     |           |           |
     |           |           |
     v           v           v
+--------+   +--------+   +--------+
| Worker |   | Worker |   | Worker |
+--------+   +--------+   +--------+
Features
Job server
The job server is Angelas main process. It manages all your workers, listens for new job-requests, distributes these jobs to your workers and send back responses to the client.
One server can manage multiple pools of workers and hence handle various types of jobs.
The job server will fire up worker-processes as defined in your project configuration. It will monitor the workers and for example restart processes if a worker crashes.
It is also capable of basic load-balancing so jobs will always be passed to the next idle worker.
Worker
Angela provides an API to easily build worker processes. Each worker typically does one kind of job (even though in can handle multiple types).
You would than start multiple pools of worker processes which handle the different kind of jobs required in your application.
Example
<?phpclass WorkerA extends \Nekudo\Angela\Worker
{
publicfunctiontaskA(string$payload) : string
{
// Do some work:sleep(1);
// Return a response (needs to be string!):returnstrrev($payload);
}
}
// Create new worker and register jobs:$worker = newWorkerA;
$worker->registerJob('taskA', [$worker, 'taskA']);
$worker->run();
Client
The client is a simple class which allows you to send commands or job-requests to the server. It can send commands, normal jobs or background-jobs.
Normal jobs are blocking as the client will wait for a response. Background jobs however are non-blocking. They will be processed by the server but the client does not wait for a response.
Example
<?php$client = new \Nekudo\Angela\Client;
$client->addServer('tcp://127.0.0.1:5551');
$result = $client->doNormal('taskA', 'some payload'); // result is "daolyap emos"$client->close();
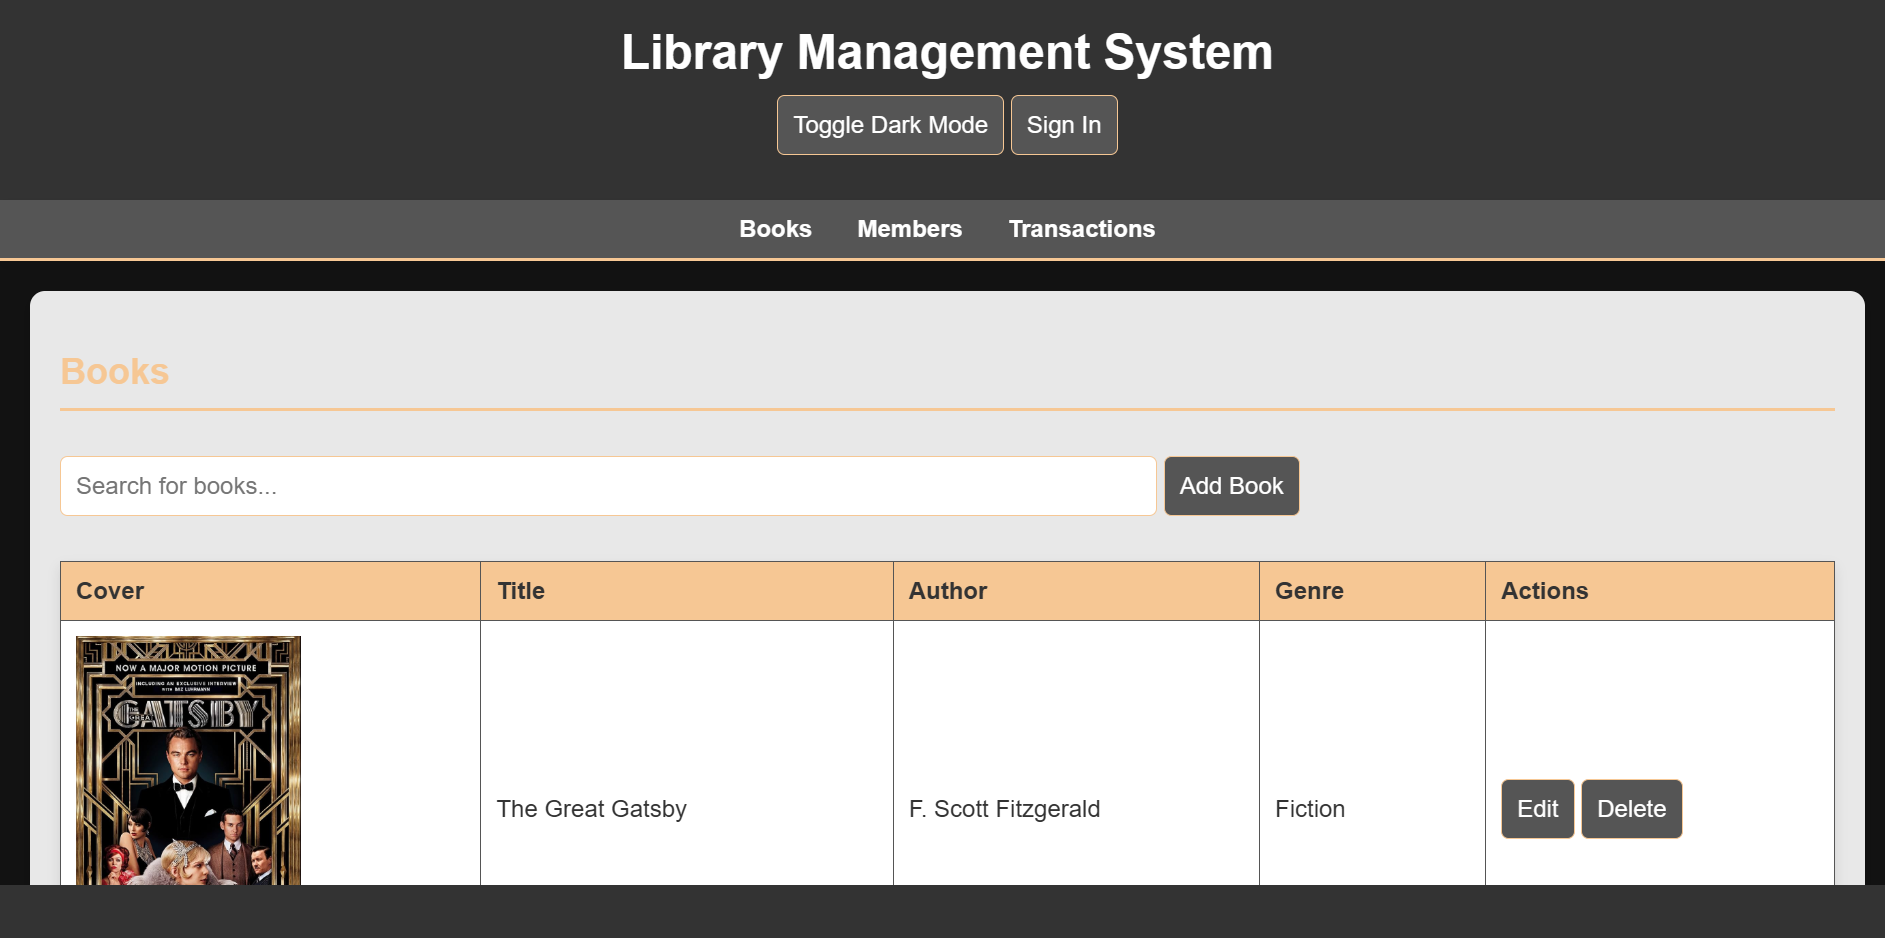
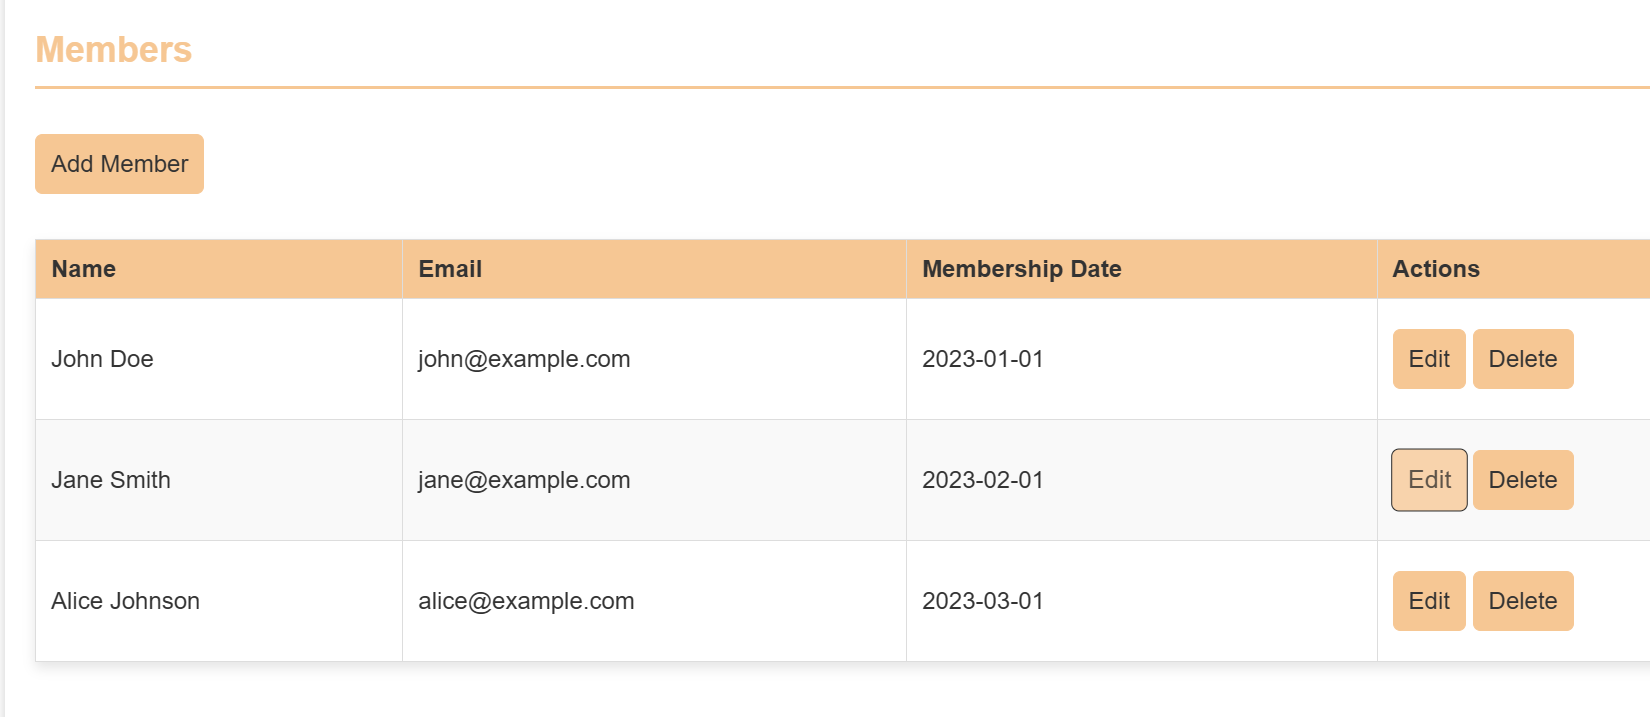
This repository houses the code for an integrated library management system developed as a group project for our GitHub class.
The system aims to streamline library operations, providing a user-friendly interface for both librarians and patrons.
Features
1. User Interface:
Dark Mode: Supports a visually appealing dark mode for comfortable nighttime use.
Responsive Design: Adapts seamlessly to various screen sizes, ensuring optimal viewing on desktops, laptops, tablets, and smartphones.
2. Core Functionality:
User Authentication: Secure user login and registration system.
3. Member Management:
Add new members to the library.
Edit existing member details (e.g., contact information, membership status).
4. Transaction Management:
Record book checkouts, returns, and renewals.
Track fines and overdue notices.
Edit transaction records as needed.
5. Book Management:
Add new books to the library catalog, Including:
Book title, author, ISBN, publication year.
Detailed descriptions and summaries.
Upload book cover images using image URLs.
Edit existing book records with updated information.
Technology:
Built with HTML, CSS, and JavaScript for a robust and dynamic user experience.
Cross-platform compatibility: Functions effectively across different operating systems and browsers.
Hosting: The website is hosted using GitHub Pages.
Requirements
1. IDE /Code Editor: VSCode or any other.
2. Hosting: GitHub Pages.
3. Live Server Extension: To review the website.
4. Prettier Extension: To organise the code.
5. Auto Rename Tag Extension: For fast code access write up.
6. Gitingest: For making attractive layout of code.
7. Code Runner Extension: For detection of valid syntax.
Installation/Procedure
1. Clone the Repository:
Clone this repository to your local machine using Git:
Bash
git clone <https://github.com/Haksham/GP6_5>
2. Open in VS Code:
Open the cloned repository in VS Code.
Install Live Server Extension.
Open the VS Code Extensions panel (Ctrl+Shift+X).
Search for “Live Server” and install the extension by Ritwick Dey.
Start the Live Server.
Open the index.html file in the editor.
Right-click anywhere within the file and select “Open with Live Server” from the context menu.
3. Access the Website:
The website will open in your default web browser.
The URL will be displayed in the VS Code output panel.
4. Deployment to GitHub Pages
Create a gh-pages Branch:
Open the terminal in VS Code.
Create a new branch named gh-pages:
Bash
git checkout -b gh-pages
Copy Files to gh-pages Branch:
Copy all the necessary files (HTML, CSS, JavaScript, images, etc.) from the main branch to the gh-pages branch.
Commit and Push Changes:
Commit the changes to the gh-pages branch:
Bash
  git add .
  git commit -m "Deploy to GitHub Pages"
  Push the gh-pages branch to the remote repository:
  Bash
5. git push origin gh-pages
Configure GitHub Pages:
Go to your repository settings on GitHub.
Under “GitHub Pages,” select the “gh-pages” branch as the source.
Access the Deployed Website:
The deployed website will be available at the following URL:
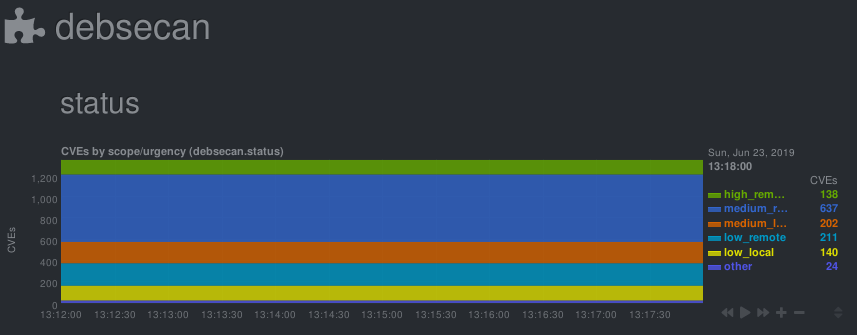
Check/graph the number CVEs in currently installed packages.
This is a python.d module for netdata. It parses output from debsecan
The number of vulnerabilities is graphed by scope (locally/remotely exploitable) and urgency (low/medium/high).
Installation
This module expects the output of debsecan, split by scope/urgency in files at /var/log/debsecan. A script to generate the expected reports is provided.
# install debsecan
apt install debsecan
# clone the repository
git clone https://gitlab.com/nodiscc/netdata-debsecan
# install the generation script
cp netdata-debsecan/usr_local_bin_debsecan-by-type /usr/local/bin/debsecan-by-type
# generate initial debsecan reports in /var/log/debsecan/
/usr/local/bin/debsecan-by-type
# (optional) configure dpkg to refresh the file after each run# generating reports after each apt/dpkg run can take some time
cp netdata-debsecan/etc_apt_apt.conf.d_99debsecan /etc/apt/apt.conf.d/99debsecan
# add a cron job to refresh the file every hour
cp netdata-debsecan/etc_cron.d_debsecan /etc/cron.d/debsecan
# install the module/configuration file
netdata_install_prefix="/opt/netdata"# if netdata is installed from binary/.run script
netdata_install_prefix=""# if netdata is installed from OS packages
cp netdata-debsecan/debsecan.chart.py $netdata_install_prefix/usr/libexec/netdata/python.d/
cp netdata-debsecan/debsecan.conf $netdata_install_prefix/etc/netdata/python.d/
# restart netdata
systemctl restart netdata
No configuration is required. Common python.d plugin options can be changed in debsecan.conf.
The default update every value is 600 seconds so the initial chart will only be created after 10 minutes. Change this value if you need more accuracy.
You can get details on vulnerabilities by reading mail sent by debsecan, or by reading the output of debsecan --format report.
You can work towards decreasing the count of vulnerabilities by upgrading/patching/removing affected software, or by mitigating them through other means and adding them to debsecan’s whitelist.