Lavoro Agile è una applicazione che consente di gestire gli accordi di lavoro agile per un’amministrazione pubblica.
L’implementazione è aderente a quanto previsto dal Decreto Legge 31 dicembre 2020, n. 183 e s.m.i.
L’applicazione si integra con:
il motore di Workflow open source Elsa, su cui girano i workflow di approvazione degli accordi
Zucchetti, da cui recupera attraverso un report custom l’anagrafica utenti
ZTimesheet, a cui invia le informazioni su attività e giornate di smart working
Ministero del Lavoro, cui vengono inviate informazioni sull’accordo di lavoro agile utili alle azioni di controllo
Server di email per inviare le notifiche
Server LDAP per autenticare gli utenti in una installazione Intranet
L’integrazione con Zucchetti è disattivabile ed al suo posto è possibile attivare la modalità che consente di recuperare le informazioni sulle strutture direttamente dalla base dati, previo censimento delle stesse da parte dell’amministratore.
Tutte le interazioni in uscita (ZTimesheet, Ministero, Mail) sono mediate da un sistema di code.
A corredo dell’applicazione, sono presenti due applicazioni che consentono di definire workflow e di monitorare lo stato della coda e dei workflow.
Per una guida completa all’architettura ed ai flussi, fare riferimento alla documentazione di progetto
Funzionalità
L’applicativo prevede cinque tipologie di utenti, ognuno con proprie funzionalità specifiche. Di seguito si riportano i nomi delle figure previste e le principali funzionalità ad esse associate.
L’Amministratore, identificato dal ruolo Administrator, può:
Creare utenze associandogli eventualmente il ruolo di amministratore
Creare strutture. Nel caso in cui sia attiva l’integrazione con Zucchetti, sarà possibile solamente creare strutture di primo livello ed associare alle stesse il referente interno; nel caso in cui sia attiva la modalità struttura su database, sarà anche possibile censire gli altri due livelli, nonché impostare le informazioni sui responsabili di ogni livello.
Gestire i componenti della segreteria tecnica
Attuare delle remediation sugli accordi (riportarli in uno stato precedente, eliminarli, eliminarne la valutazione, …)
Il componente della Segreteria Tecnica, identificato da un utente che è stato censito dall’amministratore come componente della Segreteria tecnica, può:
Ricercare accordi per tutti i dipendenti dell’amministrazione
Intervenire nel flusso di valutazione dell’accordo attraverso l’inserimento di note al dipendente
Consultare un cruscotto di monitoraggio che consente di ottenere delle statistiche sui dati presenti in piattaforma (ad esempio numero di accordi attivi, media delle giornate di lavoro agile per accordo, …)
Il Referente interno, identificato da un utente che è stato impostato come referente tecnico per almeno una stuttura, può ricercare accordi per le strutture cui è assegnato. Lo scopo di questo ruolo è quello di poter supportare i dipendenti nelle fasi di definizione, sottoscrizione e valutazione dell’accordo
Il Responsabile dell’accordo, identificato da un utente che è stato impostato come responsabile dell’accordo per almeno una struttura, può:
Ricercare accordi trasmessi dai suoi sottoposti
Approvare, rifiutare e chiedere integrazioni per un accordo trasmesso da un sottoposto
Valutare un accordo trasmesso da un sottoposto
L’utente, ovvero un qualsiasi utente dell’applicativo. E’ importante notare che tutte le figure sopra riportate sono riconosciuti anche come utenti. Accedendo quindi all’applicativo, anche le altre figure saranno in grado di effettuare le operazioni riservate ad un utente normale:
Definire e sottoscrivere un accordo di lavoro agile
Ricercare i propri accordi
Visualizzare i dettagli dei propri accordi precedenti
Visualizzare i dettagli dell’accordo in essere
Recedere da un accordo
Inviare richiesta di rinnovo per un accordo in corso
Inviare richiesta di revisione per un accordo in corso
Visualizzare lo storico delle fasi attraversate da un accordo
Navigare nella storia degli accordi
Compilare l’auto valutazione da poter inviare in approvazione al proprio responsabile
Roadmap
Le seguenti funzionalità sono pianificate per le prossime release di Lavoro Agile:
Possibilità di chiedere il reset della password
Possibilità di impostare una password per i componenti della segreteria tecnica
Aggiornamento della versione del motore di Workflow Elsa
Possibilità di utilizzare un workflow gestito da codice invece che dalla libreria di workflow Elsa
Possibilità di personalizzare il nome dell’amministrazione editando il file di configurazione
Revisione dell’interfaccia utente per migliorarne la UX
Aggiunta del supporto per inviare Email tramite le API di Graph
Come contribuire
I contribuiti atti al miglioramento del software sono sempre i benvenuti. Di seguito le regole per poter contribuire:
1. Fork and Clone del repository
Per inziare, è necessario creare un fork del repository verso il proprio account GitHub. Per creare un fork, dalla pagina iniziale del repository, cliccare sul pulsante “Fork” nella barra di comando in alto. Una volta creato il fork, si potrà procedere con il clone del repository nella propria macchina attraverso il comando:
Sostituire YOUR_USERNAME con la propria username GitHub. Per ulteriori informazioni su come effettuare un fork, consultare la documentazione ufficiale GitHub qui.
Aprire la cartella in cui è stato clonato il repository e quindi aprire il file di solution PCM-LavoroAgile.sln con l’IDE preferito. L’importante è che l’IDE supporti lo sviluppo .NET 8. E’ possibile ad esempio utilizzare Visual Studio, JetBrains Rider, o Visual Studio Code con le appropriate estensioni.
Aprendo la soluzione nella cartella src saranno presenti tre applicazioni web:
PCM-LavoroAgile, l’applicazione principale che consente di avviare il sistema di gestione degli accordi di lavoro agile
PCM-MonitoringDashboard, l’applicazione che consente di avviare la dasboard di monitoraggio dei workflow e delle code
PCM-WorkflowDefinition, l’applicazione che consente di definire workflow da eseguire sul motore di workflow Elsa (fare riferimento alla documentazione per informazioni su come pubblicare nuovi flussi o aggiornamenti al flusso di approvazione)
Le web app sono configurate per facilitare al massimo lo sviluppo, quindi non dipendono da software installato su macchine diverse da quella su cui si vuole sviluppare ed utilizzano istanze locali, eventualmente dockerizzate, di SQLServer e del server Mail. Inoltre l’app principale (PCM-LavoroAgile) è configurata con l’integrazione Zucchetti spenta e per utilizzare le strutture prelevate dal database.
Per SQLServer ed il server di mail, il consiglio è di installarsi Docker Desktop o Podman Desktop ed istanziarsi due container a partire dalle immagini di:
rnwood/smtp4dev, un server e-mail fake
mcr.microsoft.com/mssql/server, la versione contenerizzata ufficiale Microsoft, di SQLServer nella versione 2022
Se si utilizza Visual Studio e si seleziona il profilo di esecuzione IIS Express, le app sono configurate:
PCM-LavoroAgile per rispondere alla url https://localhost:44380/
PCM-MonitoringDashboard per rispondere alla url https://localhost:44318/
PCM-WorkflowDefinition per rispondere alla url https://localhost:44304/
Se si utilizza una configurazione diversa da quella fin qui descritta, prima di avviare per la prima volta le applicazioni è necessario effettuare alcune modifiche nei file di configurazione.
Per l’applicazione principale (PCM-LavoroAgile), bisogna agire sul file appsettings.json/appsettings.Development.json di questo progetto (di cui si trova una descrizione completa nella documentazione di progetto). Sono da modificare:
Le connessioni al database, presenti nelle chiavi di configurazione ConnectionStrings:DefaultConnection e ConnectionStrings:CAPConnection, che dovranno essere modificate per puntare al proprio database server (Lavoro Agile utilizza SQLServer, ma si è liberi di utilizzare qualunque database supportato da Entity Framework modificando il codice di configurazione del database provider presente nel metodo AddDbContext del file di estensione StartupExtensions)
MailSettings, da configure con le coordinate del server si posta elettronica
AllowedOrigins, da modificare con la base url dell’app di monitoring (PCM-MonitoringDashboard)
Elsa:Server:BaseUrl, da modificare con la base url dell’app principale (PCM-LavoroAgile)
Ci sono poi tre configurazioni che possono essere utili:
StruttureService, il cui valore può essere sostituito con Infrastructure.Services.ZucchettiStruttureService, Infrastructure se si vuole utilizzare l’integrazione con i servizi di Zucchetti (molto probabilmente sarà necessario prima adattare il connettore per farlo funzionare con la propria istanza Zucchetti in quanto i servizi di recupero dell’anagrafica e delle giornate di smart working sono servizi custom definiti su Zucchetti)
MigrationJobEnabled, che consente di abilitare il job che inizializza il database al primo avvio dell’applicazione. Se si preferisce eseguire la preparazione del database in autonomia (ad esempio perché non si hanno i permessi di admin sul database), mettere questa chiave a false ed eseguire in qualsiasi ordine gli script presenti nella folder scripts (sono script idempotenti quindi non è un problema se dovessero essere accidentalmente eseguiti più volte)
AdminUser, che contiene username e password dell’utente Admin creato dal sistema durante la prima esecuzione o dagli script se si è preferito inizializzare il database a mano. Username e password riportati in questa configurazione serviranno per accedere all’applicazione la prima volta.
Per quanto riguarda invece l’applicazione PCM-MonitoringDashboard, prima di avviarla per la prima volta, è necessario dare un’occhiata al file appsettings.json/appsettings.Development.json ed in particolare controllare ed eventualmente modificare le chiavi:
ConnectionStrings:CAPConnection, da modificare per far puntare l’app al proprio database
Elsa:Server:BaseAddress, per impostare la base url dell’app principale (PCM-LavoroAgile).
Per evitare l’accidentale push di credenziali o informazioni sensibili, si consiglia di non inserire queste informazioni direttamente nei file di config ma di utilizzare il Secret Manager di .NET. E’ possibile accedere al manager:
Da Visual Studio con il tasto destro del mouse sul progetto e quindi cliccando su Manage User Secrets
Da linea di comando. In questo caso per prima cosa è necessario aprire un prompt, posizionarsi nella cartella dell’app da configurare e quindi inizializzare il manager con il comando dotnet user-secrets init e quindi aggiungere voci con il comando dotnet user-secrets set "Chiave:Sottochiave" "Valore".
E’ possibile trovare maggiori informazioni sul Secret Managerqui.
Consultare la documentazione di progetto per ottenere informazioni su come partire con una nuova installazione.
Se si apportano modifiche ad almeno uno dei context, è necessario generare i file di migration ed aggiornare i file sql presenti nella cartella scripts.
L’applicazione si compone di tre context:
IdentityContext, dedicato alla parte di identity
StrutturaContext, dedicato alla parte di gestione delle strutture
AccordoContext, dedicato alla parte di gestione degli accordi
Visual Studio rende semplici e supportate da GUI le operazioni di compilazione, generazione dei pacchetti di rilascio e generazione dei file di migrazione. Nel caso in cui si voglia procedere con la .NET 8 command line interface, di seguito si riportano le indicazioni per compilare le tre applicazioni.
Posizionarsi nella cartella dell’applicazione da compilare / rilasciare
Compilare eseguendo il comando dotnet build --runtime win-x64. Consultare la documentazione riportata qui per maggiori informazioni sul comando di build.
Creare il pacchetto eseguendo il comando dotnet publish --output 'build' --self-contained true --runtime win-x64. Consultare la documentazione riportata qui per maggiori informazioni sul comando di publish.
Nei comandi:
--self-contained valorizzato a true, consente di inglobare nel pacchetto i runtime del framework: può essere omesso se si vuole che l’applicazione utilizzi la framework installata a sistema. In questo caso sarà preventivamente necessario installare sulla macchina il runtime di .NET scaricabile da qui (si precisa a tal proposito che la framework core è multipiattaforma e di conseguenza potrà essere installata su Windows, macOS e Linux).
--runtime specifica il runtime da “includere” nel pacchetto (negli esempi win-x64 includerà il runtime per Windows 64 bit, qui è possibile consultare l’elenco dei runtime identifier utilizzabili).
Il pacchetto generato dal comando di publish è quello che deve essere pubblicato sull’application server di riferimento. Fare riferimento alla documentazione ufficiale dell’application server per ottenere informazioni sull’installazione di un’applicazione .NET Core 8.
Le migrazioni vanno eseguite posizionandosi nella cartella dell’app principale (PCM-LavoroAgile).
La prima volta che si vuole generare una migrazione, è necessario fare il restore del tool lanciando il comando
dotnet tool restore
Questo installerà la versione 8.0.6 del tool dotnet-ef.
La tabella seguente riporta, per ogni context i comandi da lanciare per generare il nuovo file migrazione ed aggiornare il file di script.
Context
Migration
Script
IdentityContext
dotnet ef migrations add XXXX --context identitycontext --output-dir 'Migrations/Identity'
dotnet ef migrations script --context identitycontext --idempotent --output ..\..\scripts\identity.sql
StrutturaContext
dotnet ef migrations add XXXX --context strutturacontext --output-dir 'Migrations/Struttura'
dotnet ef migrations script --context strutturacontext --idempotent --output ..\..\scripts\struttura.sql
AccordoContext
dotnet ef migrations add XXXX --context accordocontext --output-dir 'Migrations/Accordo'
dotnet ef migrations script --context accordocontext --idempotent --output ..\..\scripts\accordo.sql
3. Sottomettere una PR con le proprie modifiche
Quando si sono completate le modifiche al codice e si è pronti per rilasciarlo, effettuare la push del codice verso il proprio fork e quindi dall’interfaccia di GitHub, effettuare una pull request verso il repository ufficiale. Cercare di fornire più informazioni possibili per aiutare i revisori nel compito di verifica del codice. Per maggiori informazioni visitare la pagina ufficiale di GitHub Creare una pull request da un fork.
A Notifications Script for upgrades available on Gentoo’s Portage System
This script runs the eix-diff utility and looks for Upgrades(indicated in the output as [U]).
On detection of Upgrades available this script will compile a list, compare it with a previously sent list(if one exists)
and then if these are upgrades previously not notified on an email will be sent with the available upgrades.
#Requiremets:
Python 3.4+
Gentoo Linux installation
The app-portage/eix toolkit installed
A cron entry that runs eix-sync before this script executes
SMTP availability(using /usr/bin/mail)
#Installation
copy the EixNotifier.py and config folder to an appropriate tools location on your linux system.
copy the example.ini to default.ini setting the appropriate settings to your specific configuration.
EmailAddress should be the email address to send the notice to.
CacheDir should be the location that the script can use to store cached upgrade lists(previous runs)
CacheFile should be updated with whatever you want to call the cachefile.(preserve the %(CacheDir)s/ in order to preserve the CacheDir usage
(optional) set a crontab to run after your eix-sync would complete in order for the notifier to parse the changes and notify you.
This is a game in development. It’s planned to become something between “Just Shapes and Beats” and “Cuphead”.
That means it’ll become a bullet hell with focus on music and rhythm and with an open Level selection menu.
Who made this?
You will also be able to see this in the ingame credits once they’re implemented, but here’s the crew so far:
Programming
Riedler
Philip Damianik
Sketches & Art:
Dark Rosemary
Playtesting:
Andreas S. (Windows)
Philip Damianik (dual-screen Windows)
Compiling:
Riedler (Linux)
Andreas S. (Windows)
Philip Damianik (build pipeline)
Music:
Riedler
Dark Rosemary
Levels:
Riedler
Compatibility
You don’t need any special libraries to run it on Windows or Linux.
MacOS is currently unsupported, so please refer to compiling and figure it out with the guides for Linux and/or Windows. This may improve in the future.
It should run on all major Linux distributions, but only Ubuntu and Arch Linux are supported.
It should also run on everything above including Windows XP, but only Windows 10 is supported.
Feel free to file an issue for any incompatibilities.
Screenshots
No screenshots are yet available, because it’s so early in development right now, but Dark Rosemary drew an amazing sketch of what it’s going to look like:
Usage
Download the matching executable for your OS and save it somewhere where you’ll easily find it again, e.g. in a new folder on your Desktop.
Then download the level archive (base_levels.zip or base_levels.tar.xz) and the data archive (base_data.zip or base_data.tar.xz) and extract them into the executable folder as levels/ and data/. Make sure that your extraction program of choice doesn’t pack those folders into new ones (base_levels and base_data).
When you first start the program, all settings are assumed to be the defaults. A config file conf.json will be created after changing the settings and saving them.
The menu is controllable with the mouse and a few keys. ESC is usually for going back and Enter for confirming stuff.
In the main game, the character is controllable with WASD. You can pause with ESC.
All of those controls can be changed in the settings, as well as various other stuff.
Adding resources
All resources are in the data/ subfolder.
All textures are specified in data/sprites.json, in the format "sprite_name":["file_name",true], where "file_name" is the relative file path without file extension (only png is allowed) and true is a boolean that determines if the upscaling method is set as Nearest-Neighbour or Linear.
Animations are also supported, and can be specified in the format "animation_name":[["file1","file2",…],[18,true]], where as many files as necessary can be specified and 18 is the number of frames one picture should last. Animations aren’t supported in all objects, but in most. If they’re not supported, the animation will stay at frame 0.
All sound effects are specified in data/sfx.json, in the format "sfx_name":["file_name",false], where "file_name" is the relative file path without file extension in the opus format, and false is a boolean that determines if the file is streamed to playback or loaded on program startup. false is heavily recommended here, and true can lead to crashes in some circumstances.
All levels are in seperate folders in levels/. A tutorial on how to create new levels will be made soon.
Compiling
on windows
You’ll need python for this. Make sure to download the newest version.
In the cmd:
First run pip3 install -r requirements.txt
Then run python3 setup.py. If this doesn’t produce any output, try pyinstaller \args\, where \args\ is all the options that aren’t commented out in setup.py. I haven’t figured out why this happens in windows yet, if you know, please file an issue.
After the command finished successfully, there should be a build/ and a dist/ directory. You can delete the build/ directory, and move the executable from the dist/ directory wherever you want.
If you encounter any error that’s not explained in this guide, please file an issue in the repo.
on Linux
In bash (or zsh probably too):
First run pip3 install -r requirements.txt --user.
Then run python3 setup.py, which, after a short wait, produces a build/ and a dist/ directory. You can delete the build/ directory, and move the executable from the dist/ directory wherever you want.
If you encounter any error that’s not explained in this guide, please file an issue in the repo.
Tired of spending most of your testing time mocking objects like there’s no tomorrow? Yes. Moka provides you with two simple methods to reduce your effort on such a tedious task, and with an incredible abstraction layer between the most popular mock engines and you.
Installation
You can install the package via composer:
composer require --dev facile-it/moka
Usage
To use Moka in your tests simply use function Moka\Plugin\PHPUnit\moka() (see generators section below) and run Moka::clean() before every test. A simple interface will let you create moka (mock) objects and decorate them with stub methods and properties via a fluent interface:
<?phpnamespaceFoo\Tests;
useMoka\Moka;
usefunctionMoka\Plugin\PHPUnit\moka;
class FooTest extends \AnyTestCase
{
private$foo;
protectedfunctionsetUp(): void
{
Moka::clean();
// The subject of the test.$this->foo = newFoo(
moka(BarInterface::class)->stub([
// Property name => value.'$property' => 3,
// Method name => return value.'method1' => moka(AcmeInterface::class),
'method2' => true
])
);
}
//...
}
Alternatively, instead of using moka(), you can call Moka::phpunit(string $fqcnOrAlias, string $alias = null): ProxyInterface.
Being such a simple project, Moka can be integrated in an already existing test suite with no effort.
Notice: if you are extending PHPUnit TestCase, to simplify the cleaning phase we provide a MokaCleanerTrait which automatically runs Moka::clean() after each test.
<?phpnamespaceFoo\Tests;
useMoka\Traits\MokaCleanerTrait;
usePHPUnit\Framework\TestCase;
usefunctionMoka\Plugin\PHPUnit\moka;
class FooTest extends TestCase
{
use MokaCleanerTrait;
protectedfunctionsetUp(): void
{
// No call to Moka::clean() needed.// ...
}
// ...
}
You can rely on the original mock object implementation to be accessible (in the example below, PHPUnit’s – for Prophecy see below):
Creates a proxy containing a mock object (according to the selected strategy) for the provided FQCN and optionally assigns an $alias to it to be able to get it later:
<?php$mock1 = moka(FooInterface::class); // Creates the mock for FooInterface.$mock2 = moka(FooInterface::class); // Gets a different mock.var_dump($mock1 === $mock2);
// bool(false)
The $alias allows you to store mock instances:
<?php$mock1 = moka(FooInterface::class, 'foo'); // Creates a mock for FooInterface.$mock2 = moka('foo'); // Get the mock previously created.var_dump($mock1 === $mock2);
// bool(true)
Accepts an array of method or property stubs with format [$name => $value], where $namemust be a string and $value can be of any type, including another mock object.
Caution:
Properties are identified by symbol $ prepended to their names
An exception instance set as a method value will be thrown when the method is called
Notice: method stubs are valid for any invocation of the defined methods and cannot be overridden.
If you need more granular control over invocation strategies, you can get access to the original mock object implementation.
Supported mock object generators
Currently we ship Moka with built-in support for PHPUnit mock objects.
We support other generators as well, but you need to install the relevant packages to make them work:
We provide a specific moka() function for each supported strategy, as well as a static method (self documented in the function itself):
Moka\Plugin\PHPUnit\moka
Moka\Plugin\Prophecy\moka
Moka\Plugin\Mockery\moka
Moka\Plugin\Phake\moka
Prophecy native behavior
Prophecy lets you stub methods by calling them directly on the ObjectProphecy. Moka doesn’t support such a behavior, but we provide an easy workaround:
If you feel a genius and want to create your own mock generator (or add support for an existing one), just implement Moka\Plugin\PluginInterface and the relative Moka\Strategy\MockingStrategyInterface:
Extend AbstractMockingStrategy for an easier (and stricter) implementation of your strategy:
<?phpnamespaceMoka\Plugin\YourOwn;
useMoka\Strategy\AbstractMockingStrategy;
useMoka\Stub\MethodStub;
class YourOwnMockingStrategy extends AbstractMockingStrategy
{
publicfunction__construct()
{
// TODO: Implement __construct() method.
}
protectedfunctiondoBuild(string$fqcn)
{
// TODO: Implement doBuild() method.
}
protectedfunctiondoDecorateWithMethod($mock, MethodStub$stub)
{
// TODO: Implement doDecorateWithMethod() method.
}
protectedfunctiondoGet($mock)
{
// TODO: Implement doGet() method.
}
protectedfunctiondoCall($mock, string$methodName)
{
// Override doCall() if you need special behavior.// See ProphecyMockingStrategy::doCall().
}
}
Warning: your plugin FQCN must match the template Moka\Plugin\YourOwn\YourOwnPlugin, where YourOwn is the name of the plugin.
Both your plugin and your strategy must pass our test cases (please install phpunit/phpunit to run them):
You can pass all the options for positioning. See docs for computePosition.
<buttonid="trigger-element">Toggle popover!</button><PopovertriggerElement="#trigger-element"// Full control over positiontargetPositionArea="top center"><div>I'm a content</div></Popover>;
Multiple trigger events with vue-style modifiers
You can pass multiple trigger events with modifiers:
Events support the following modifiers:
capture
once
prevent
stop
passive
<buttonid="trigger-element">Toggle popover!</button><PopovertriggerElement="#trigger-element"triggerEvents="click.capture|pointerdown"><div>I'm a content</div></Popover>
Custom anchor element
Sometimes it’s necessary the anchor element to be different from trigger element. You may pass optional selector to find anchor element:
<divid="anchor-element"></div><buttonid="trigger-element">Togglepopover!</button><PopovertriggerElement="#trigger-element"// Here you can pass CSS selector or HTML elementanchorElement="#anchor-element"><div><buttonautofocus>hi</button>
This div is visible when popover is open!
</div></Popover>
Installation
This package has the following peer dependencies:
"solid-js": "^1.8"
so you need to install required packages by yourself.
pnpm i solid-js solid-simple-popover
Usage
import{Popover}from"solid-simple-popover";<buttonid="trigger-button">Toggle popover</button><PopovertriggerElement="trigger-button"dataAttributeName="data-open"// You may pass custom selector hereanchorElement="#trigger-button"// Astro supportcontentElementSelector="div"><div>This div is visible when popover is open!</div></Popover>;
Types
import{JSXElement,ParentComponent}from"solid-js";typeValidPositionAreaX=|"left"|"right"|"start"|"end"|"center"|"selft-start"|"self-end"|"x-start"|"x-end";typeValidPositionAreaY=|"top"|"bottom"|"start"|"end"|"center"|"self-start"|"self-end"|"y-start"|"y-end";exporttypePositionArea= `${ValidPositionAreaY} ${ValidPositionAreaX}`;exporttypeTargetPositionArea=|PositionArea|{top?: (anchorName: string)=>string;left?: (anchorName: string)=>string;right?: (anchorName: string)=>string;bottom?: (anchorName: string)=>string;};exporttypePopoverProps={/** * HTML Element or CSS selector to find trigger element which triggers popover */triggerElement?: JSXElement;/** * HTML element or CSS selector to find anchor element which is used for positioning * Can be used with Astro, because astro wraps trigger element into astro-slot * and position breaks */anchorElement?: string|HTMLElement;open?: boolean;defaultOpen?: boolean;/** * Disables listening to trigger events * Note: if your trigger element has `disabled` state (like button or input), popover also won't be triggered */disabled?: boolean;/** * @default "pointerdown" * If set to null no event would trigger popover, * so you need to trigger it mannually. * Event name or list of event names separated by "|" which triggers popover. * You may also add modifiers like "capture", "passive", "once", "prevent", "stop" to the event separated by ".": * @example "pointerdown.capture.once.prevent|click" */triggerEvents?: string|null;/** * Close popover on interaction outside * @default true * By default when popover is open it will listen to "pointerdown" event outside of popover content and trigger */closeOnOutsideInteraction?: boolean;/** * Data attribute name to set on trigger element * @default "data-popover-open" */dataAttributeName?: string;/** * CSS selector to find html element inside content * Can be used with Astro, because astro wraps element into astro-slot * and position breaks */contentElementSelector?: string;/** * Close popover on escape key press. * Uses 'keydown' event with 'Escape' key. * @default true */closeOnEscape?: boolean;onOpenChange?: (open: boolean)=>void;/** @default absolute */targetPosition?: "absolute"|"fixed";/** * @see https://css-tricks.com/css-anchor-positioning-guide/#aa-position-area * @default "end center" */targetPositionArea?: TargetPositionArea;/** @see https://css-tricks.com/css-anchor-positioning-guide/#aa-position-visibility */positionVisibility?: "always"|"anchors-visible"|"no-overflow";/** @see https://css-tricks.com/css-anchor-positioning-guide/#aa-position-try-fallbacks */positionTryFallbacks?: (anchorName: string)=>string[];/** @see https://css-tricks.com/css-anchor-positioning-guide/#aa-position-try-order */positionTryOrder?: "normal"|"most-width"|"most-height"|"most-block-size"|"most-inline-size";/** @see https://css-tricks.com/css-anchor-positioning-guide/#aa-anchor-size */targetWidth?: string;/** @see https://css-tricks.com/css-anchor-positioning-guide/#aa-anchor-size */targetHeight?: string;};exportdeclareconstPopover: ParentComponent<PopoverProps>;
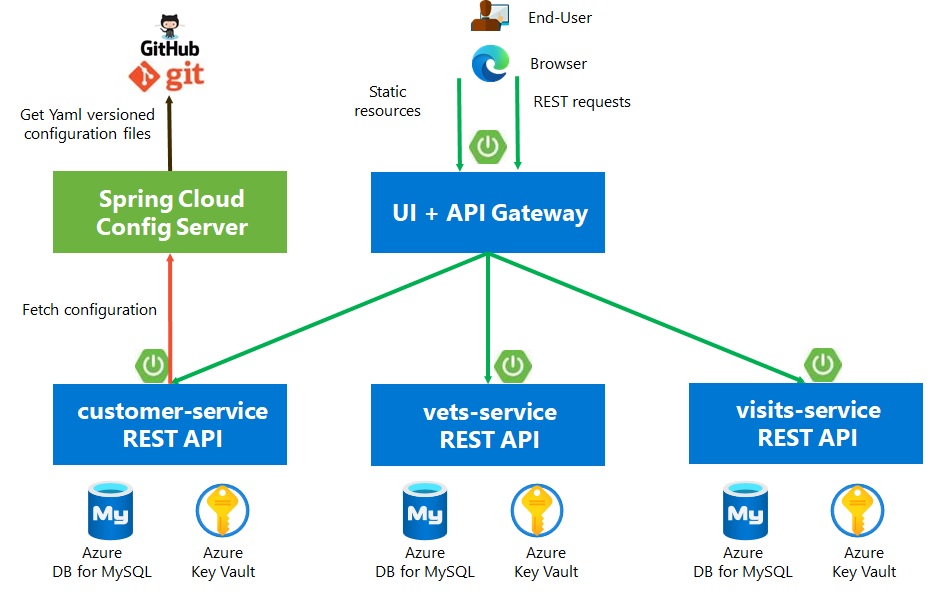
Distributed version of the Spring PetClinic Sample Application deployed to AKS
page_type: sample
languages:
java
products:
Azure Kubernetes Service
description: “Deploy Spring Boot apps using AKS & MySQL”
urlFragment: “spring-petclinic-microservices”
This microservices branch was initially derived from AngularJS version to demonstrate how to split sample Spring application into microservices.
To achieve that goal we use IaC with Azure Bicep, MS build of OpenJDK 11, GitHub Actions, Azure AD Workload Identity, Azure Key Vault, Azure Container Registry, Azure Database for MySQL
dash ‘-‘ are not supported in GH secrets, so the secrets must be named in GH with underscore ‘_’.
(Also the ‘&’ character in the SPRING_DATASOURCE_URL must be escaped with ‘&’
jdbc:mysql://petcliaks777.mysql.database.azure.com:3306/petclinic?useSSL=true&requireSSL=true&enabledTLSProtocols=TLSv1.2&verifyServerCertificate=true)
Add the App secrets used by the Spring Config to your GH repo secrets / Actions secrets / Repository secrets / Add :
Secret Name
Secret Value example
SPRING_DATASOURCE_PASSWORD
PUT YOUR PASSWORD HERE
SPRING_CLOUD_AZURE_TENANT_ID
PUT YOUR AZURE TENANT ID HERE
VM_ADMIN_PASSWORD
PUT YOUR PASSWORD HERE
LOCATION="westeurope"
RG_KV="rg-iac-kv33"
RG_APP="rg-iac-aks-petclinic-mic-srv"

az group create --name $RG_KV --location $LOCATION
az group create --name $RG_APP --location $LOCATION
SPN_APP_NAME="gha_aks_run"# /!\ In CloudShell, the default subscription is not always the one you thought ...
subName="set here the name of your subscription"
subName=$(az account list --query "[?name=='${subName}'].{name:name}" --output tsv)echo"subscription Name :"$subName
SUBSCRIPTION_ID=$(az account list --query "[?name=='${subName}'].{id:id}" --output tsv)
SUBSCRIPTION_ID=$(az account show --query id -o tsv)
TENANT_ID=$(az account show --query tenantId -o tsv)
Add your AZURE_SUBSCRIPTION_ID, AZURE_TENANT_ID to your GH repo Settings / Security / Secrets and variables / Actions / Actions secrets / Repository secrets
In the GitHub Action Runner, to allow the Service Principal used to access the Key Vault, execute the command below:
#az ad app create --display-name $SPN_APP_NAME > aad_app.json# This command will output JSON with an appId that is your client-id. The objectId is APPLICATION-OBJECT-ID and it will be used for creating federated credentials with Graph API calls.#export APPLICATION_ID=$(cat aad_app.json | jq -r '.appId')#export APPLICATION_OBJECT_ID=$(cat aad_app.json | jq -r '.id')#az ad sp create --id $APPLICATION_ID#export CREDENTIAL_NAME="gha_aks_run"#export SUBJECT="repo:ezYakaEagle442/aks-java-petclinic-mic-srv:environment:PoC" # "repo:organization/repository:environment:Production"#export DESCRIPTION="GitHub Action Runner for Petclinic AKS demo"#az rest --method POST --uri 'https://graph.microsoft.com/beta/applications/$APPLICATION_OBJECT_ID/federatedIdentityCredentials' --body '{"name":"$CREDENTIAL_NAME","issuer":"https://token.actions.githubusercontent.com","subject":"$SUBJECT","description":"$DESCRIPTION","audiences":["api://AzureADTokenExchange"]}'# SPN_PWD=$(az ad sp create-for-rbac --name $SPN_APP_NAME --skip-assignment --query password --output tsv)
az ad sp create-for-rbac --name $SPN_APP_NAME --skip-assignment --sdk-auth
SPN_APP_ID=$(az ad sp list --all --query "[?appDisplayName=='${SPN_APP_NAME}'].{appId:appId}" --output tsv)#SPN_APP_ID=$(az ad sp list --show-mine --query "[?appDisplayName=='${SPN_APP_NAME}'].{appId:appId}" --output tsv)# TENANT_ID=$(az ad sp list --show-mine --query "[?appDisplayName=='${SPN_APP_NAME}'].{t:appOwnerOrganizationId}" --output tsv)# Enterprise Application
az ad app list --show-mine --query "[?displayName=='${SPN_APP_NAME}'].{objectId:id}"
az ad app show --id $SPN_APP_ID# This is the unique ID of the Service Principal object associated with this application.# SPN_OBJECT_ID=$(az ad sp list --show-mine --query "[?displayName=='${SPN_APP_NAME}'].{objectId:id}" -o tsv)
SPN_OBJECT_ID=$(az ad sp list --all --query "[?displayName=='${SPN_APP_NAME}'].{objectId:id}" -o tsv)
az ad sp show --id $SPN_OBJECT_ID# the assignee is an appId
az role assignment create --assignee $SPN_APP_ID --scope /subscriptions/${SUBSCRIPTION_ID}/resourceGroups/${RG_KV} --role contributor
az role assignment create --assignee $SPN_OBJECT_ID --scope /subscriptions/${SUBSCRIPTION_ID}/resourceGroups/${RG_KV} --role contributor
# https://learn.microsoft.com/en-us/azure/key-vault/general/rbac-guide?tabs=azure-cli#azure-built-in-roles-for-key-vault-data-plane-operations# "Key Vault Secrets User"
az role assignment create --assignee $SPN_APP_ID --scope /subscriptions/${SUBSCRIPTION_ID}/resourceGroups/${RG_KV} --role 4633458b-17de-408a-b874-0445c86b69e6
az role assignment create --assignee $SPN_OBJECT_ID --scope /subscriptions/${SUBSCRIPTION_ID}/resourceGroups/${RG_KV} --role 4633458b-17de-408a-b874-0445c86b69e6
# "Key Vault Secrets Officer"
az role assignment create --assignee $SPN_APP_ID --scope /subscriptions/${SUBSCRIPTION_ID}/resourceGroups/${RG_KV} --role b86a8fe4-44ce-4948-aee5-eccb2c155cd7
az role assignment create --assignee $SPN_OBJECT_ID --scope /subscriptions/${SUBSCRIPTION_ID}/resourceGroups/${RG_KV} --role b86a8fe4-44ce-4948-aee5-eccb2c155cd7
# "DNS Zone Contributor"# https://learn.microsoft.com/en-us/azure/role-based-access-control/built-in-roles#dns-zone-contributor
az role assignment create --assignee $SPN_APP_ID --scope /subscriptions/${SUBSCRIPTION_ID} --role befefa01-2a29-4197-83a8-272ff33ce314
az role assignment create --assignee $SPN_OBJECT_ID --scope /subscriptions/${SUBSCRIPTION_ID} --role befefa01-2a29-4197-83a8-272ff33ce314
# https://learn.microsoft.com/en-us/azure/role-based-access-control/built-in-roles#virtual-machine-contributor# Virtual Machine Contributor has permission 'Microsoft.Network/publicIPAddresses/read'#az role assignment create --assignee $SPN_APP_ID --scope /subscriptions/${SUBSCRIPTION_ID} --role 9980e02c-c2be-4d73-94e8-173b1dc7cf3c#az role assignment create --assignee $SPN_OBJECT_ID --scope /subscriptions/${SUBSCRIPTION_ID} --role 9980e02c-c2be-4d73-94e8-173b1dc7cf3c# Network-contributor: https://learn.microsoft.com/en-us/azure/role-based-access-control/resource-provider-operations#microsoftnetwork
az role assignment create --assignee $SPN_APP_ID --scope /subscriptions/${SUBSCRIPTION_ID} --role 4d97b98b-1d4f-4787-a291-c67834d212e7
az role assignment create --assignee $SPN_OBJECT_ID --scope /subscriptions/${SUBSCRIPTION_ID} --role 4d97b98b-1d4f-4787-a291-c67834d212e7
# https://learn.microsoft.com/en-us/azure/role-based-access-control/role-assignments-portal#prerequisites# /!\ To assign Azure roles, you must have: requires to have Microsoft.Authorization/roleAssignments/write and Microsoft.Authorization/roleAssignments/delete permissions, # such as User Access Administrator or Owner.
az role assignment create --assignee $SPN_APP_ID --scope /subscriptions/${SUBSCRIPTION_ID}/resourceGroups/${RG_KV} --role Owner
az role assignment create --assignee $SPN_APP_ID --scope /subscriptions/${SUBSCRIPTION_ID}/resourceGroups/${RG_APP} --role Owner
az role assignment create --assignee $SPN_OBJECT_ID --scope /subscriptions/${SUBSCRIPTION_ID}/resourceGroups/${RG_KV} --role Owner
az role assignment create --assignee $SPN_OBJECT_ID --scope /subscriptions/${SUBSCRIPTION_ID}/resourceGroups/${RG_APP} --role Owner
**RBAC Permission model is set on KV, the pre-req requires to have Microsoft.Authorization/roleAssignments/write and Microsoft.Authorization/roleAssignments/delete permissions, such as User Access Administrator or Owner.
“Key Vault Secrets User” built-in role read secret contents including secret portion of a certificate with private key. Only works for key vaults that use the ‘Azure role-based access control’ permission model.
Paste in your JSON object for your service principal with the name AZURE_CREDENTIALS as secrets to your GH repo Settings / Security / Secrets and variables / Actions / Actions secrets / Repository secrets
You can test your connection with CLI :
az login --service-principal -u $SPN_APP_ID -p $SPN_PWD --tenant $TENANT_ID
Add SUBSCRIPTION_ID, TENANT_ID, SPN_APP_ID and SPN_PWD as secrets to your GH repo Settings / Security / Secrets and variables / Actions / Actions secrets / Repository secrets
Your GitHub personal access token needs to have the workflow scope selected. You need at least delete:packages and read:packages scopes to delete a package. You need contents: read and packages: write permissions to publish and download artifacts
Create SSH Keys, WITHOUT any passphrase (type enter if prompt)
Add $ssh_key & $ssh_key.pub as secrets SSH_PRV_KEY & SSH_PUB_KEY to your GH repo Settings / Security / Secrets and variables / Actions / Actions secrets / Repository secrets
To avoid to hit the error below :
"The subscription is not registered to use namespace 'Microsoft.KeyVault'. See https://aka.ms/rps-not-found for how to register subscriptions.\",\r\n \"details\": [\r\n ***\r\n \"code\": \"MissingSubscriptionRegistration\"
AAD_WI_CLI_VERSION=1.0.0
wget https://github.com/Azure/azure-workload-identity/releases/download/v$AAD_WI_CLI_VERSION/azwi-v$AAD_WI_CLI_VERSION-linux-amd64.tar.gz
gunzip azwi-v$AAD_WI_CLI_VERSION-linux-amd64.tar.gz
tar -xvf azwi-v$AAD_WI_CLI_VERSION-linux-amd64.tar
./azwi version
env:
APP_NAME: petcliaks
LOCATION: westeurope # francecentral
RG_KV: rg-iac-kv33 # RG where to deploy KV
RG_APP: rg-iac-aks-petclinic-mic-srv # RG where to deploy the other Azure services: AKS, ACR, MySQL, etc.
ACR_NAME: acrpetcliaks
VNET_NAME: vnet-aks
VNET_CIDR: 172.16.0.0/16
AKS_SUBNET_CIDR: 172.16.1.0/24
AKS_SUBNET_NAME: snet-aks
START_IP_ADRESS: 172.16.1.0
END_IP_ADRESS: 172.16.1.255
MYSQL_SERVER_NAME: petcliaks
MYSQL_DB_NAME: petclinic
MYSQL_ADM_USR: mys_adm
MYSQL_TIME_ZONE: Europe/Paris
MYSQL_CHARACTER_SET: utf8
MYSQL_PORT: 3306
DEPLOY_TO_VNET: false
KV_NAME: kv-petcliaks33 # The name of the KV, must be UNIQUE. A vault name must be between 3-24 alphanumeric characters# https://learn.microsoft.com/en-us/azure/key-vault/secrets/secrets-best-practices#secrets-rotation# Because secrets are sensitive to leakage or exposure, it's important to rotate them often, at least every 60 days. # Expiry date in seconds since 1970-01-01T00:00:00Z. Ex: 1672444800 ==> 31/12/2022'
SECRET_EXPIRY_DATE: 1703980800 # ==> 31/12/2023
AZURE_CONTAINER_REGISTRY: acrpetcliaks # The name of the ACR, must be UNIQUE. The name must contain only alphanumeric characters, be globally unique, and between 5 and 50 characters in length.
REGISTRY_URL: acrpetcliaks.azurecr.io # set this to the URL of your registry
REPOSITORY: petclinic # set this to your ACR repository
PROJECT_NAME: petclinic # set this to your project's name
KV_NAME: kv-petcliaks33 # The name of the KV, must be UNIQUE. A vault name must be between 3-24 alphanumeric characters
RG_KV: rg-iac-kv33 # RG where to deploy KV
RG_APP: rg-iac-aks-petclinic-mic-srv # RG where to deploy the other Azure services: AKS, ACR, MySQL, etc.# ==== Azure storage to store Artifacts , values must be consistent with the ones in storage.bicep ====:
AZ_STORAGE_NAME : stakspetcliaks # customize this
AZ_BLOB_CONTAINER_NAME: petcliaks-blob # customize this
Once you commit, then push your code update to your repo, it will trigger a Maven build which you need to can CANCELL from https://github.com/USERNAME/aks-java-petclinic-mic-srv/actions/workflows/maven-build.yml the first time you trigger the workflow, anyway it will fail because the ACR does not exist yet and the docker build will fail to push the Images.
Deploy AKS and the petclinic microservices Apps with IaC
You can read the Bicep section but you do not have to run it through CLI, instead you can manually trigger the GitHub Action deploy-iac.yml, see the Workflow in the next section
AKS has dependencies on services outside of that virtual network. For a list of these dependencies
see the AKS doc
Troubleshoot :
If the AKS cluster was provisionned in a FAILED state, try :
az resource update --name $ClusterName --resource-group $RgName --resource-type Microsoft.ContainerService/managedClusters --debug
az resource show --name $ClusterName --resource-group $RgName --resource-type Microsoft.ContainerService/managedClusters --debug
Security
secret Management
Azure Key Vault integration is implemented through Spring Cloud for Azure
Quick local test just to verify that the jar files can be run (the routing will not work out of a K8S cluster, and also the apps will fail to start as soon as management port 8081 will be already in use by config server …) :
/!\ IMPORTANT WARNING: projects must be built with -Denv=cloud EXCEPT for api-gateway
Every microservice is a Spring Boot application and can be started locally.
Please note that supporting services (Config Server) must be started before any other application (Customers, Vets, Visits and API).
Startup Admin server is optional.
If everything goes well, you can access the following services at given location:
For Learning purpose the App uses Key Vault to fetch secrets like the DB password but if would be even better using Passwordless Features: https://aka.ms/delete-passwords
Spring Boot is a framework aimed to help developers to easily create and build stand-alone, production-grade Spring based Applications that you can “just run”.
Spring Cloud Config provides server and client-side support for externalized configuration in a distributed system. With the Spring Cloud Config Server you have a central place to manage external properties for applications across all environments.
Spring Cloud Config Server is a centralized service that via HTTP provides all the applications configuration (name-value pairs or equivalent YAML content). The server is embeddable in a Spring Boot application, by using the @EnableConfigServer annotation.
In other words, the Spring Cloud Config Server is simply a Spring Boot application, configured as a Spring Cloud Config Server, and that is able to retrieve the properties from the configured property source. The property source can be a Git repository, svn or Consul service.
A Spring Boot application properly configured, can take immediate advantage of the Spring Config Server. It also picks up some additional useful features related to Environment change events. Any Spring Boot application can easily be configured as a Spring Cloud Config Client.
About how to build the container image, read ACR doc
Database configuration
In its default configuration, Petclinic uses an in-memory database (HSQLDB) which gets populated at startup with data.
A similar setup is provided for MySql in case a persistent database configuration is needed.
Dependency for Connector/J, the MySQL JDBC driver is already included in the pom.xml files.
You can check the DB connection with this sample project.
Use the Spring ‘mysql’ profile
To use a MySQL database, you have to start 3 microservices (visits-service, customers-service and vets-services)
with the mysql Spring profile. Add the --spring.profiles.active=mysql as programm argument.
In the application.yml of the [Configuration repository], set the initialization-mode to never ( or ALWAYS).
If you are running the microservices with Docker, you have to add the mysql profile into the (Dockerfile)[docker/Dockerfile]:
The config files are located in each micro-service at src/main/resources/applicationinsights.json
The Java agent is downloaded in the App container in /tmp/app, you can have a look at a Docker file, example at ./docker/petclinic-customers-service/Dockerfile
applicationinsights.configuration.file Java system property
In our configuration, in the containers the applicationinsights.json is located at BOOT-INF/classes/applicationinsights.json
so we must set APPLICATIONINSIGHTS_CONFIGURATION_FILE=BOOT-INF/classes/applicationinsights.json
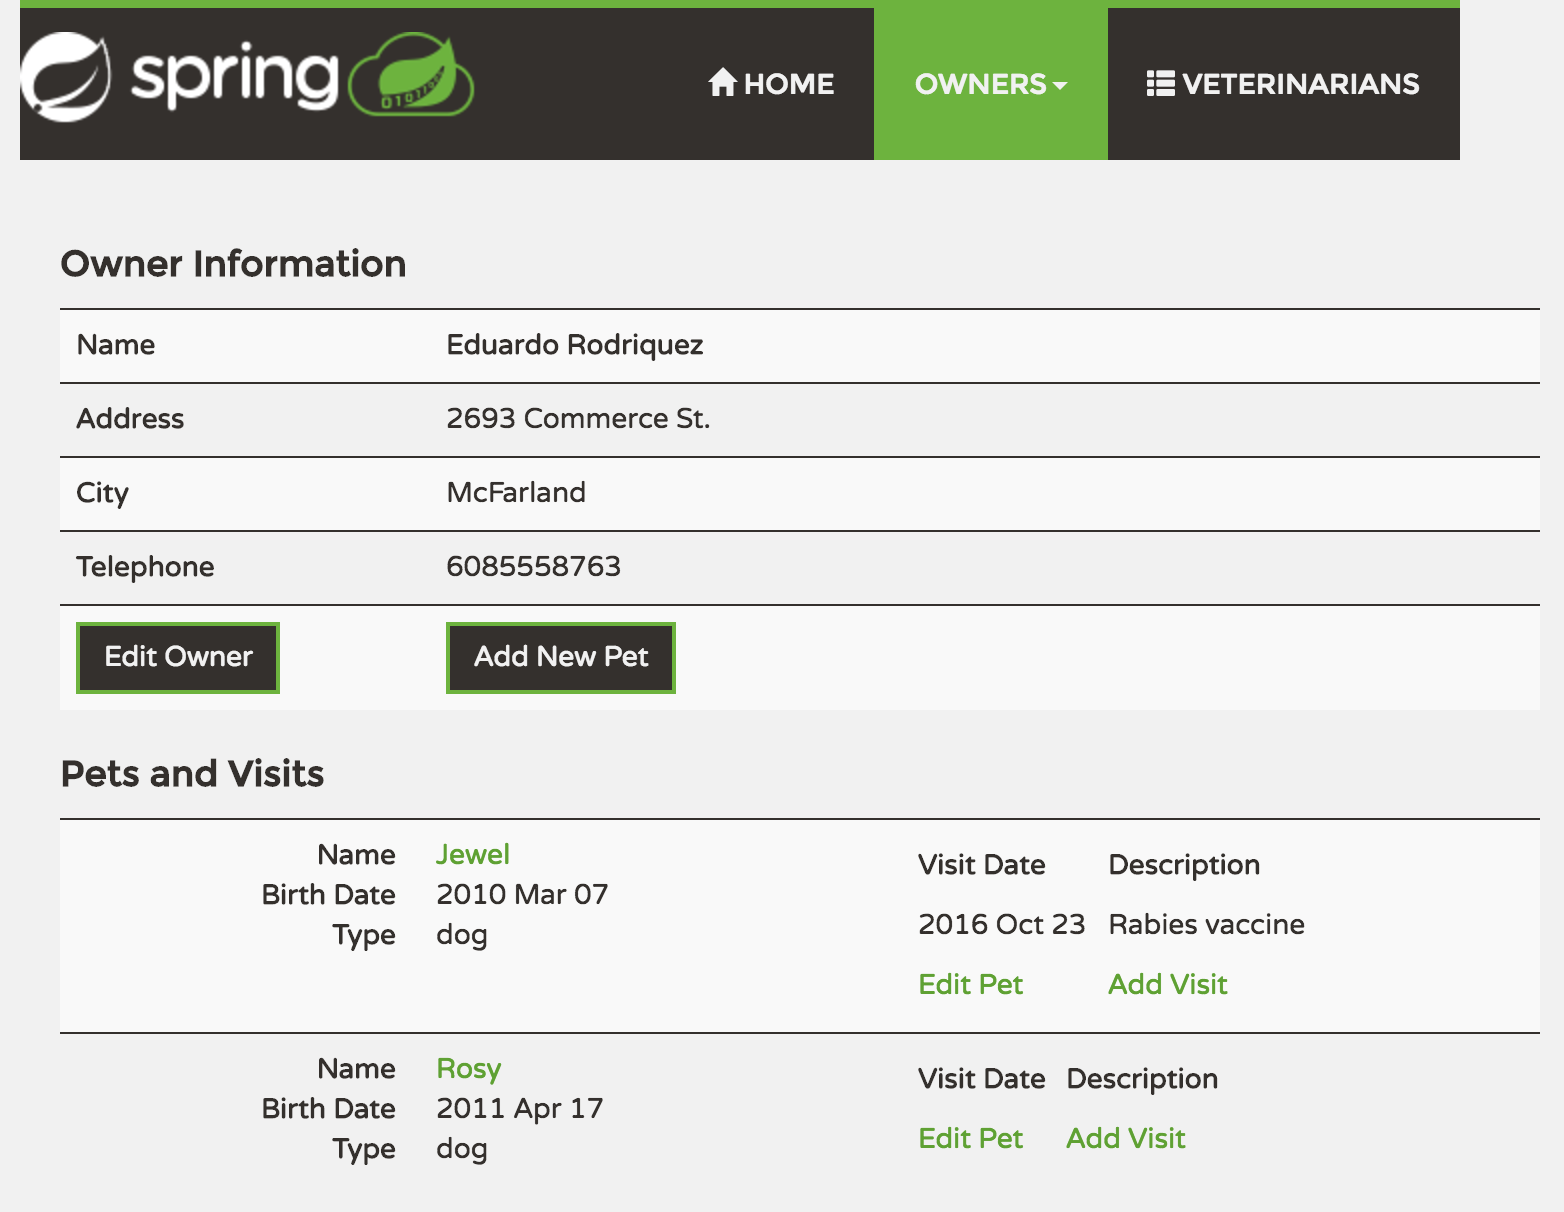
Use the Petclinic application and make a few REST API calls
Open the Petclinic application and try out a few tasks – view pet owners and their pets,
vets, and schedule pet visits:
open http://petclinic.westeurope.cloudapp.azure.com//
You can also use your browser or curl the REST API exposed by the Petclinic application.
The admin REST API allows you to create/update/remove items in Pet Owners, Pets, Vets and Visits.
You can run the following curl commands:
curl -X GET http://petclinic.westeurope.cloudapp.azure.com/api/customer/owners
curl -X GET http://petclinic.westeurope.cloudapp.azure.com/api/customer/owners/4
curl -X GET http://petclinic.westeurope.cloudapp.azure.com/api/customer/owners/
curl -X GET http://petclinic.westeurope.cloudapp.azure.com/api/customer/petTypes
curl -X GET http://petclinic.westeurope.cloudapp.azure.com/api/customer/owners/3/pets/4
curl -X GET http://petclinic.westeurope.cloudapp.azure.com/api/customer/owners/6/pets/8/
curl -X GET http://petclinic.westeurope.cloudapp.azure.com/api/vet/vets
curl -X GET http://petclinic.westeurope.cloudapp.azure.com/api/visit/owners/6/pets/8/visits
curl -X GET http://petclinic.westeurope.cloudapp.azure.com/api/visit/owners/6/pets/8/visits
Open Actuator endpoints for API Gateway and Customers Service apps
Spring Boot includes a number of additional features to help you monitor and manage your application when you push it to production (Spring Boot Actuator: Production-ready Features). You can choose to manage and monitor your application by using HTTP endpoints or with JMX. Auditing, health, and metrics gathering can also be automatically applied to your application.
Actuator endpoints let you monitor and interact with your application. By default, Spring Boot application exposes health and info endpoints to show arbitrary application info and health information. Apps in this project are pre-configured to expose all the Actuator endpoints.
You can try them out by opening the following app actuator endpoints in a browser:
http://petclinic.westeurope.cloudapp.azure.com
open http://petclinic.westeurope.cloudapp.azure.com/manage/
open http://petclinic.westeurope.cloudapp.azure.com/manage/env
open http://petclinic.westeurope.cloudapp.azure.com/manage/configprops
open http://petclinic.westeurope.cloudapp.azure.com/api/customer/manage
open http://petclinic.westeurope.cloudapp.azure.com/api/customer/manage/env
open http://petclinic.westeurope.cloudapp.azure.com/api/customer/manage/configprops
### Monitor Petclinic logs and metrics in Azure Log Analytics
To get the App logs :```bashLOG_ANALYTICS_WORKSPACE_CLIENT_ID=`az monitor log-analytics workspace show -n $LOG_ANALYTICS_WORKSPACE -g $RESOURCE_GROUP --query customerId --out tsv`az monitor log-analytics query \ --workspace $LOG_ANALYTICS_WORKSPACE_CLIENT_ID \ --analytics-query "ContainerLog | where LogEntry has 'error' |take 100" \ --out table
Kusto Query with Log Analytics
Open the Log Analytics that you created – you can find the Log Analytics in the same Resource Group where you created the AKS cluster.
In the Log Analyics page, selects Logs blade and run any of the sample queries supplied below for AKS.
Type and run the following Kusto query to see all the logs from the AKS Service :
// https://learn.microsoft.com/en-us/azure/azure-monitor/containers/container-insights-log-query
let startTimestamp = ago(1h);
KubePodInventory
| where TimeGenerated > startTimestamp
| project ContainerID, PodName=Name, Namespace
| where PodName contains "service"and Namespace startswith "petclinic"
| distinct ContainerID, PodName
| join
(
ContainerLog
| where TimeGenerated > startTimestamp
)
on ContainerID
// at this point before the next pipe, columns from both tables are available to be "projected". Due to both
// tables having a "Name" column, we assign an alias as PodName to one column which we actually want
| project TimeGenerated, PodName, LogEntrySource, LogEntry
| summarize by TimeGenerated, LogEntry
| order by TimeGenerated desc
let FindString ="error";//Please update term you would like to find in LogEntry here
ContainerLog
| where LogEntry has FindString
| take 100
Custom metrics
Spring Boot registers a lot number of core metrics: JVM, CPU, Tomcat, Logback…
The Spring Boot auto-configuration enables the instrumentation of requests handled by Spring MVC.
All those three REST controllers OwnerResource, PetResource and VisitResource have been instrumented by the @Timed Micrometer annotation at class level.
customers-service application has the following custom metrics enabled:
@Timed: petclinic.owner
@Timed: petclinic.pet
visits-service application has the following custom metrics enabled:
Check the MySQL connector doc
Your JBCC URL should look like this for instance:
url: jdbc:mysql://localhost:3306/petclinic?useSSL=false
url: jdbc:mysql://${MYSQL_SERVER_FULL_NAME}:3306/${MYSQL_DATABASE_NAME}??useSSL=true
url: jdbc:mysql://petclinic-mysql-server.mysql.database.azure.com:3306/petclinic?useSSL=true
url: jdbc:mysql://petclinic-mysql-server.mysql.database.azure.com:3306/petclinic?useSSL=true&requireSSL=true&enabledTLSProtocols=TLSv1.2&verifyServerCertificate=true
If you face this Netty SSL Handshake issue :
eactor.core.Exceptions$ReactiveException: io.netty.handler.ssl.SslHandshakeTimeoutException: handshake timed out after 10000ms
It means that you may need to upgrade your Spring Boot version to the latest one…
See
netty/netty#12343
If you face this issue :
error Caused by: java.net.MalformedURLException: no protocol: ${SPRING_CLOUD_AZURE_KEY_VAULT_ENDPOINT}
It means that the api-gateway project had been built with mvn -B clean package –file pom.xml -DskipTests -Denv=cloud
This set the env=cloud at in the parent POM which then injects the spring-cloud-azure-starter-keyvault-secrets dependency at POM
it looks like event just having such dependency would cause the runtime to look for ${SPRING_CLOUD_AZURE_KEY_VAULT_ENDPOINT}
If you face this issue :
Spring MVC found on classpath, which is incompatible with Spring Cloud GatewayPlease set spring.main.web-application-type=reactive or remove spring-boot-starter-web dependency.
spring-cloud-starter-netflix-eureka-server depends on spring-boot-starter-web
you would need to remove the dependency on spring-boot-starter-web in the api-gateway module
The Azure SDK API change is summarized at Issue #28310
KeyVault integration runs easily when :
You use SYSTEM-Assigned MI, because then in the Config use by the Config-server you do NOT need to specify the client-id
When you use 1 & only 1 USER-Assigned MI for ALL your Apps/Micro-services, this is not a good practice from a security perspective as it is safer to assign 1 Identity to each App
When you use USER-Assigned MI, assigning 1 Identity to each App , see one App in Bicep.
In the Config used by the Config-server if you declare as many property-sources as the number of micro-services setting the client-id with the App Id (using Env. Var. set in the GH Workflow) :
  keyvault:
    secret:
      enabled: true
      property-source-enabled: true
      property-sources:
        - name: kv-cfg-vets # KV Config for each App Vets-Service
          endpoint: ${SPRING_CLOUD_AZURE_KEY_VAULT_ENDPOINT}
          credential:
            managed-identity-enabled: true
            client-id: ${VETS_SVC_APP_IDENTITY_CLIENT_ID}
          #  client-secret: ${AZURE_CLIENT_SECRET} for SPN not for MI
          # profile:
          #  tenant-id: ${SPRING_CLOUD_AZURE_TENANT_ID}
        - name: kv-cfg-visits # KV Config for each App Visits-Service
          endpoint: ${SPRING_CLOUD_AZURE_KEY_VAULT_ENDPOINT}
          credential:
            managed-identity-enabled: true
            client-id: ${VISITS_SVC_APP_IDENTITY_CLIENT_ID}
        - name: kv-cfg-customers # KV Config for each App Customers-Service
          endpoint: ${SPRING_CLOUD_AZURE_KEY_VAULT_ENDPOINT}
          credential:
            managed-identity-enabled: true
            client-id: ${CUSTOMERS_SVC_APP_IDENTITY_CLIENT_ID}
As a consequence this initially failed as each App uses the above Config and tried to fetch KV secrets from other App property-sources. which failed because it was not allowed as it was assigned only 1/4 Identity.
The solution is to remove all the above config from the Config repo and to add it instead in each App in \src\main\resources\application.yaml.
Ex for the vets-service, 1 & only 1 property-source is declared using 1 client-id only ${VETS_SVC_APP_IDENTITY_CLIENT_ID} :
spring:
  cloud:
    azure:
      #profile: # spring.cloud.azure.profile
        # subscription-id:
        # tenant-id: ${SPRING_CLOUD_AZURE_TENANT_ID}
      #credential:
        #managed-identity-enabled: true
      keyvault:
        secret:
          enabled: true
          property-source-enabled: true
          # endpoint: ${SPRING_CLOUD_AZURE_KEY_VAULT_ENDPOINT}
          property-sources:
            - name: kv-cfg-vets # KV Config for each App Vets-Service
              endpoint: ${SPRING_CLOUD_AZURE_KEY_VAULT_ENDPOINT}
              credential:
                managed-identity-enabled: true
                client-id: ${VETS_SVC_APP_IDENTITY_CLIENT_ID}
              #  client-secret: ${AZURE_CLIENT_SECRET} for SPN not for MI
              # profile:
              #  tenant-id: ${SPRING_CLOUD_AZURE_TENANT_ID}
  profiles:
    active: mysql
Contributing
The issue tracker is the preferred channel for bug reports, features requests and submitting pull requests.
For pull requests, editor preferences are available in the editor config for easy use in common text editors. Read more and download plugins at http://editorconfig.org.


 https://github.com/italia/LavoroAgile